StreamEez: live streaming with hardware acceleration
StreamEez: stream your videos with Facebook Live and YouTube
Note: there are two versions of StreamEez. One is part of Hauppauge Capture and can be found in the StreamEez tab in Hauppauge Capture. There is also a stand alone version of StreamEez which is described below.
Quick start to Twitch streaming with Hauppauge Capture's StreamEez
- In the StreamEez tab of Hauppauge Capture, click Start Device
- In Channel select Login and enter your user name and password
- You will be brought to the Twitch login service. Click Authorize
- In Location, you can select the nearest Twitch ingest point to where you are located
- When you are ready, you can click Start Streaming to go online with your video stream
File name: streameezsetup_1_5_39096.exe
Date: April 1, 2021 | File size: 76 MB | Release notes | Previous version
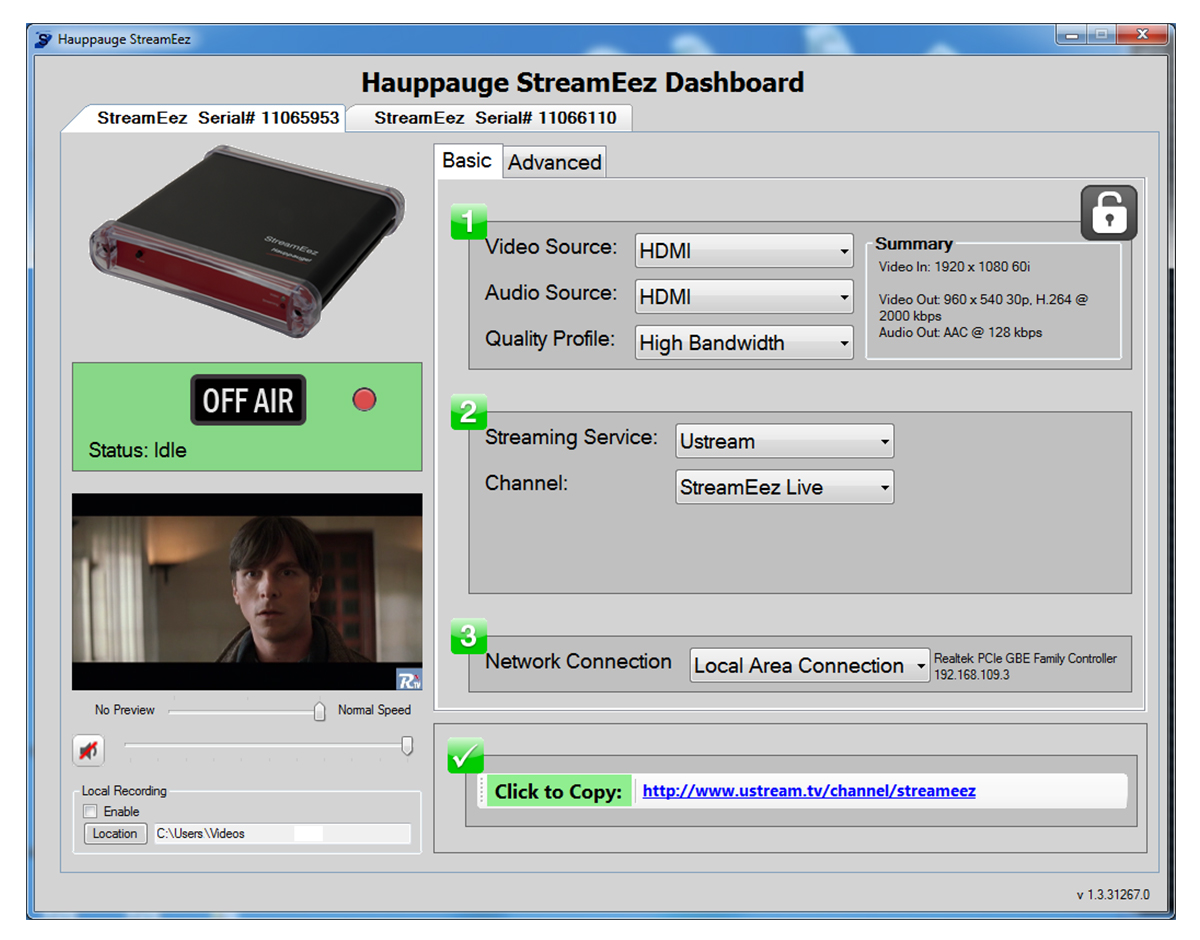
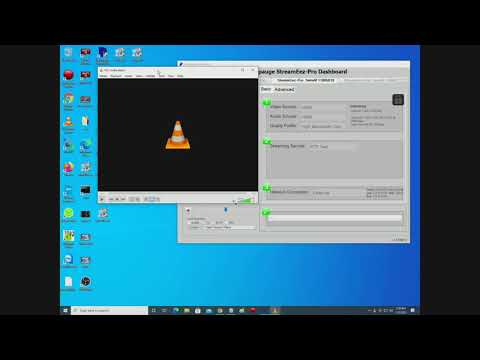
The standalone StreamEez application
Stream your live videos to Wowza, YouTube, Facebook Live and other RTMP/RTSP streaming services
click to enlarge
New features in this version
- Adds support to use a username and password in 'Generic RTMP/RTMPS' streaming
- Changes default port of RTMP/RTMPS on StreamEEz Pro to Port 0 so Facebook URL's will just work out of the box or any URL's which include the port number in the URL (which most do now)
- Removes UStream and Twitch from list of target servers (Twitch can be streamed in Hauppauge Capture with any product)
- Default service now RTMP/RTMPS for StreamEEz Pro and YouTube for other products
- HDMI Input is now default input
- For Twitch users: add your channel name and pause for a commercial break
- For YouTube users: fixes problems with YouTube recording of video streams
- Adds an automatic re-connect mode, to re-establish streaming when your Internet connection is momentarily lost
- Adds streaming support for the HD PVR Rocket
- Bug fixes for Wowza and RTMP streaming with no port specified
To install this version of StreamEez:
- Click on the download link. You will be given an option to Run or Save the file. Click Save to save the file in your Download folder.
- Run this file. It will install the StreamEez-Pro application plus the Windows driver.
- When finished running the update, you will be ask to restart your PC. Restart your PC
- While the PC is restarting, power cycle your StreamEez device to load the new firmware (remove power from the unit for a few seconds and then plug it back in).
- When your PC has rebooted, double click on the StreamEez-Pro icon.
- Under Source (upper left hand corner), make sure it is set to your Hauppauge device.
- If your cables are connected, you should now be able to stream with Twitch or YouTube.
Some tips on using StreamEez (standalone)
Step 1
- Before you change any settings, make sure you are Off Air and the Lock button is unlocked (just click on the button to unlock).
- Choose your Video Source. Xbox 360 normally uses HDMI while PS3 normally uses Component.
- Choose your Audio Source. Xbox 360 normally uses HDMI while PS3 normally uses Line.
- In Quality Profile, the default is High Bandwidth. Depending upon the uplink speed of your Internet service, you may need to change to Medium or Low bandwidth. A laggy or jerky stream means your uplink speed is too low and you need to choose a different Quality Profile.
- If you would like to preview your video in StreamEez, make sure the slider under the preview window is set to 'Normal speed'. You should now see your video in the preview window.
StreamEez Software Setup (standalone)
Step 2
- Then choose your Stream Service, either Twitch or YouTube. ( You must have an account setup with the stream service you wish to use)
- In Channel, select Login. Enter your Login and Password. You will see a message "Gathering credentials" as we check your user name and password.
- Once your user name and password are confirmed, you will see the URL of your stream in the box "Copy stream link". If you click on the words "Copy stream link", the URL will be copied to the clip board.
Step 3
- Leave the Network Connection as the default
To start streaming
- To start streaming, click the red dot next to "Off Air." The indicator should be changed to "On Air" and you will now be streaming live over the Internet!
- Once you are On Air, you cannot change any settings. You need to stop streaming by clicking the green dot next to On Air to stop the stream.
Streaming with YouTube Live using StreamEez

Live streaming guide from YouTube
Click here for instructions from YouTube
YouTube Live Quick Setup Guide
YouTube Live Streaming Quick Setup Guide for StreamEez