- Overview
- Features
- Connector Diagrams
- Specs/Models
- System Requirements
- StreamEez
- 3rd Party Apps
- FAQ
- Manuals
- Gallery
- Videos
- Buy Now
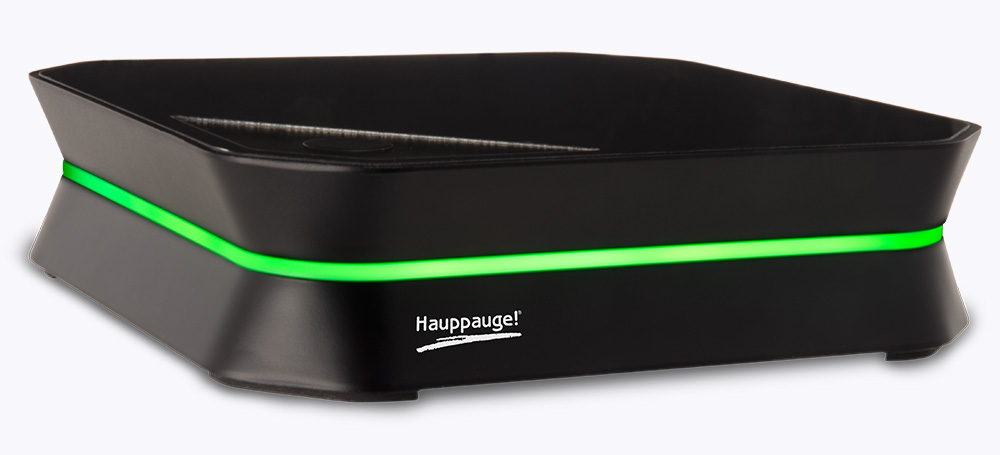
About the HD PVR 2 model 1504
Record video game play in HD on your PC or Mac

HD PVR 2 model 1504
HD Video Recoder for Windows and Mac
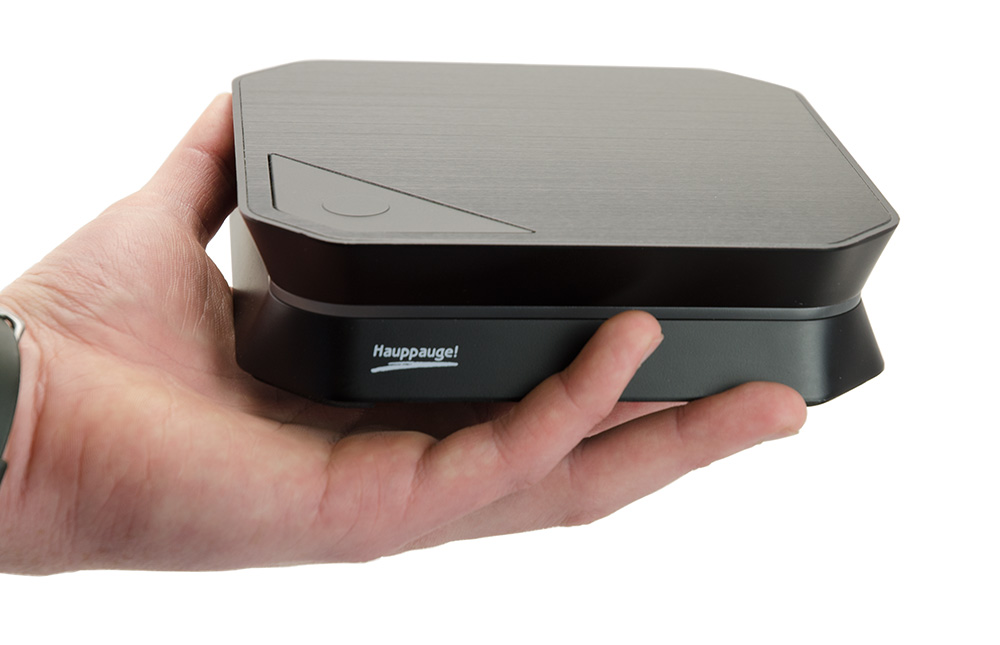
Click to enlarge
HD PVR 2 model 1504 records high definition game play video from a gaming PC, Sony® PlayStation®3 or PS4, Microsoft's Xbox® One or the Xbox 360 onto your Windows laptop or desktop PC. Make video recordings of your best game play in HD and upload to YouTube and share them with other gamers online. Or make a high definition movie of your game play to share with your friends or use it to discuss tactics with your clan members! The HD PVR 2 model 1504 has Mac support.
HD PVR 2 comes with HDMI in and out to make it easier to connect to your game console and your HD TV set. Record retro gameplay from a Nintendo 64 or other console with the yellow/white/red composite video and audio output.
HD PVR 2 model 1504 comes with a free copy of the HDPVRCapture application, so you can record your game play on your Mac and edit your recordings in iMovie.
And with HD PVR 2 model 1504’s S/PDIF optical audio input, your audio will be as amazing as the video. If you have 5.1 channel AC3 audio from HDMI or optical S/PDIF, your recordings will have 5.1 channel surrond sound AC-3 audio!
Add game commentary while you record or stream!
Hauppauge Capture, the simple to use application for recording, editing, uploading and streaming your game play, has a built-in audio mixer. Add your game commentary while you record or while you stream. And add audio from your PC (music or Skype audio can be recorded) and even put each audio source on separate tracks for easier editing in Sony Vegas or Pinnacle Studio. The Hauppauge Capture program has all the features you need for making awesome game play recordings and streams!
With HDMI and Component Video in plus no-delay HDMI video passthrough
Now with a Record button, so you can start and stop your video recordings directly from the HD PVR 2
HD PVR 2 has a top mounted record button. Hit the record button and ShowBiz opens on your PC and starts recording. Hit the record button again and ShowBiz will stop recording. This makes recording your video gameplay super easy!
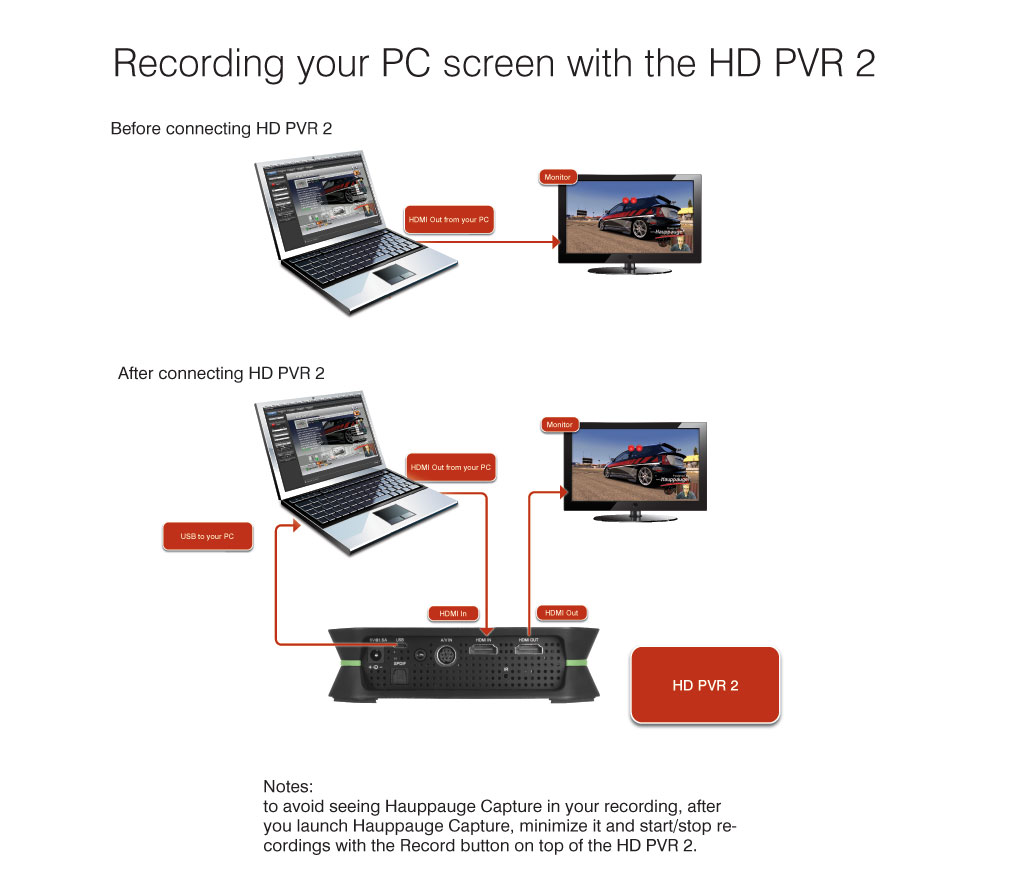
Record your PC gameplay, with no delay and no slowdown of your PC!
HD PVR 2 can be connected to the HDMI output of your PC to record your gameplay. With our "no delay passthrough", you can play your game on a TV monitor while recording. And the recording will not slow down your PC since the encoding is done within HD PVR 2!
Amazing audio and video quality
HD PVR 2 uses a pro-quality H.264 video encoder, the same video recorder which is used in TV studios. HD PVR 2 records using amazing H.264 compression at HD resolutions up to 1080p30. HD PVR 2's H.264 recording format is used by Blu-ray disks and exceeds other compression standards in video quality, providing a crisp image with amazing digital sound. And H.264 uses 1/3 the disk space compared with the popular MPEG-2 format.
Watch recordings of your best game play on your PC monitor or HD TV set
Once your recordings are on your PC hard disk, you can play them back directly on your computer screen using the included ShowBiz application. You can also transfer the recordings over your home network to your PlayStation 3, Xbox 360, or other high definition media player.
Play while you record with our no-delay HDMI video pass through!
HD PVR 2 comes with real-time video pass through, so you can watch your game play on your HD TV while recording your game on your PCs disk drive. Simply connect HD PVR 2 in between your game console and your HD TV set (HDMI in and out plus Component Video cables included).
Upload your best games to YouTube and share with your friends
HD PVR 2 comes with a one click upload to YouTube. Make HD recordings of your game play and upload your best videos to YouTube. HD PVR 2 Gaming Edition records videos in HD using H.264, which is perfect for YouTube.
Use the Personal Logo inserter to add your channel logo to all of your recordings and streams
Use the Personal Logo inserter to add your own logo to all of your recordings and video streams. The HD PVR 2 Personal Logo inserter makes it easy to make sure all of your friends see your channel logo! Adding a Personal Logo is easy: just make a 150x100 pixel BMP, JPEG or PNG file and then use Hauppauge Capture to upload your logo into the HD PVR 2. After that, the logo will be automatically added to your recordings and video streams
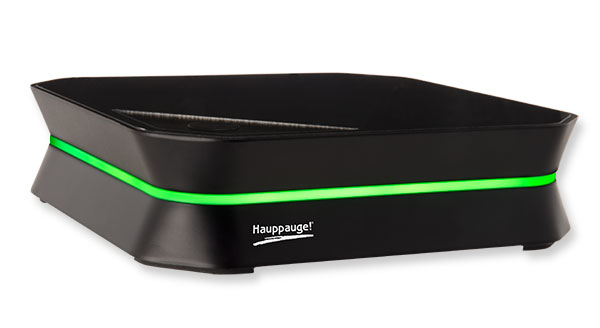
HD PVR 2 model 1504
For PC and Mac: Record, Edit and Upload Xbox One, PS4, Wii U, Xbox 360, PS3 or PC game play in HD
Features with Hauppauge Capture for Windows
Includes Facecam ... putting YOU in your YouTube videos!
Record and stream game chat and commentary
Stream your game play with in-game chat on your Twitch and YouTube channel with our hardware accelerated StreamEez
Upload gameplay to YouTube with one click. Show your best gameplay to your friends!
HD PVR 2 model 1504 includes HDPVRCapture for the Mac. Plus record full 5.1 channel surround sound!
Record retro gameplay from Nintendo 64 or other game consoles with composite video
Record up to 1080p while you play your games on your HDMI TV set. Includes our no delay pass through, so you can play while you record in HD
Includes a built-in Record button, so you can start and stop your recordings without having to be at your PC. Plus with our Personal Logo inserter, you can add your own logo to your recordings or live streaming events!
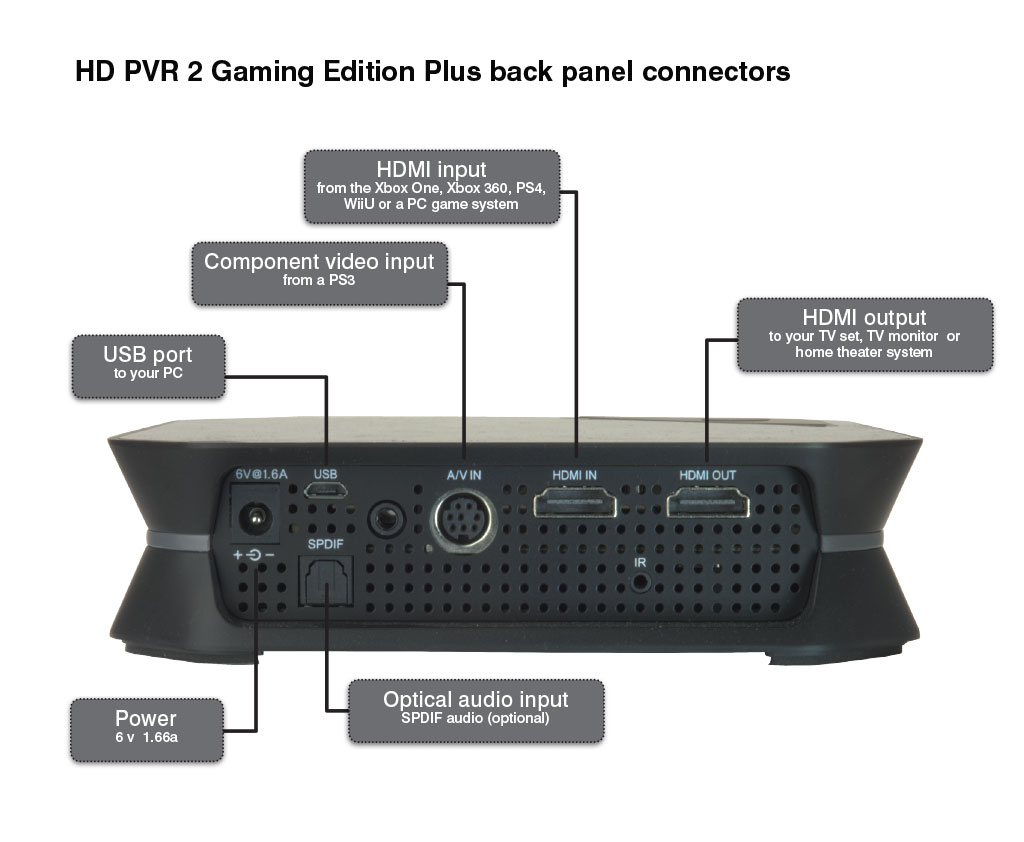
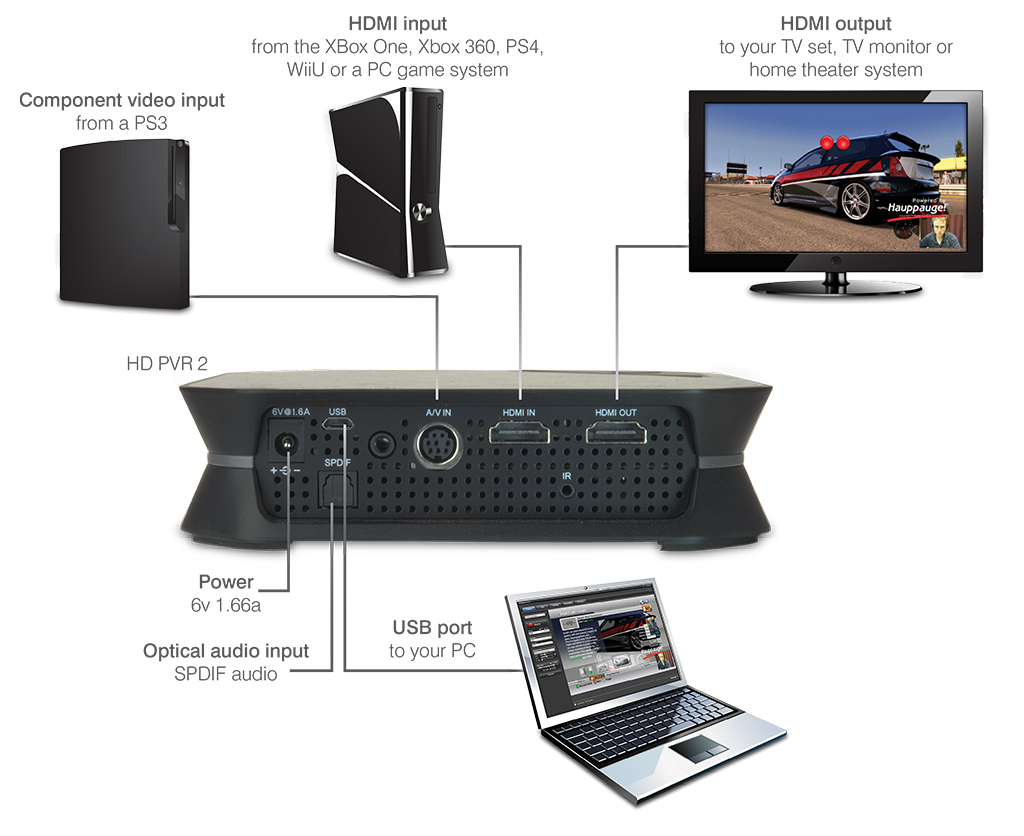
HD PVR 2 model 1504 connections
HD PVR 2 has video pass through for no delay recordings. Simply connect HD PVR 2 between your game console and your HD TV set. HD PVR 2 Gaming Edition comes with all of the cables needed!
HD PVR 2 all connections

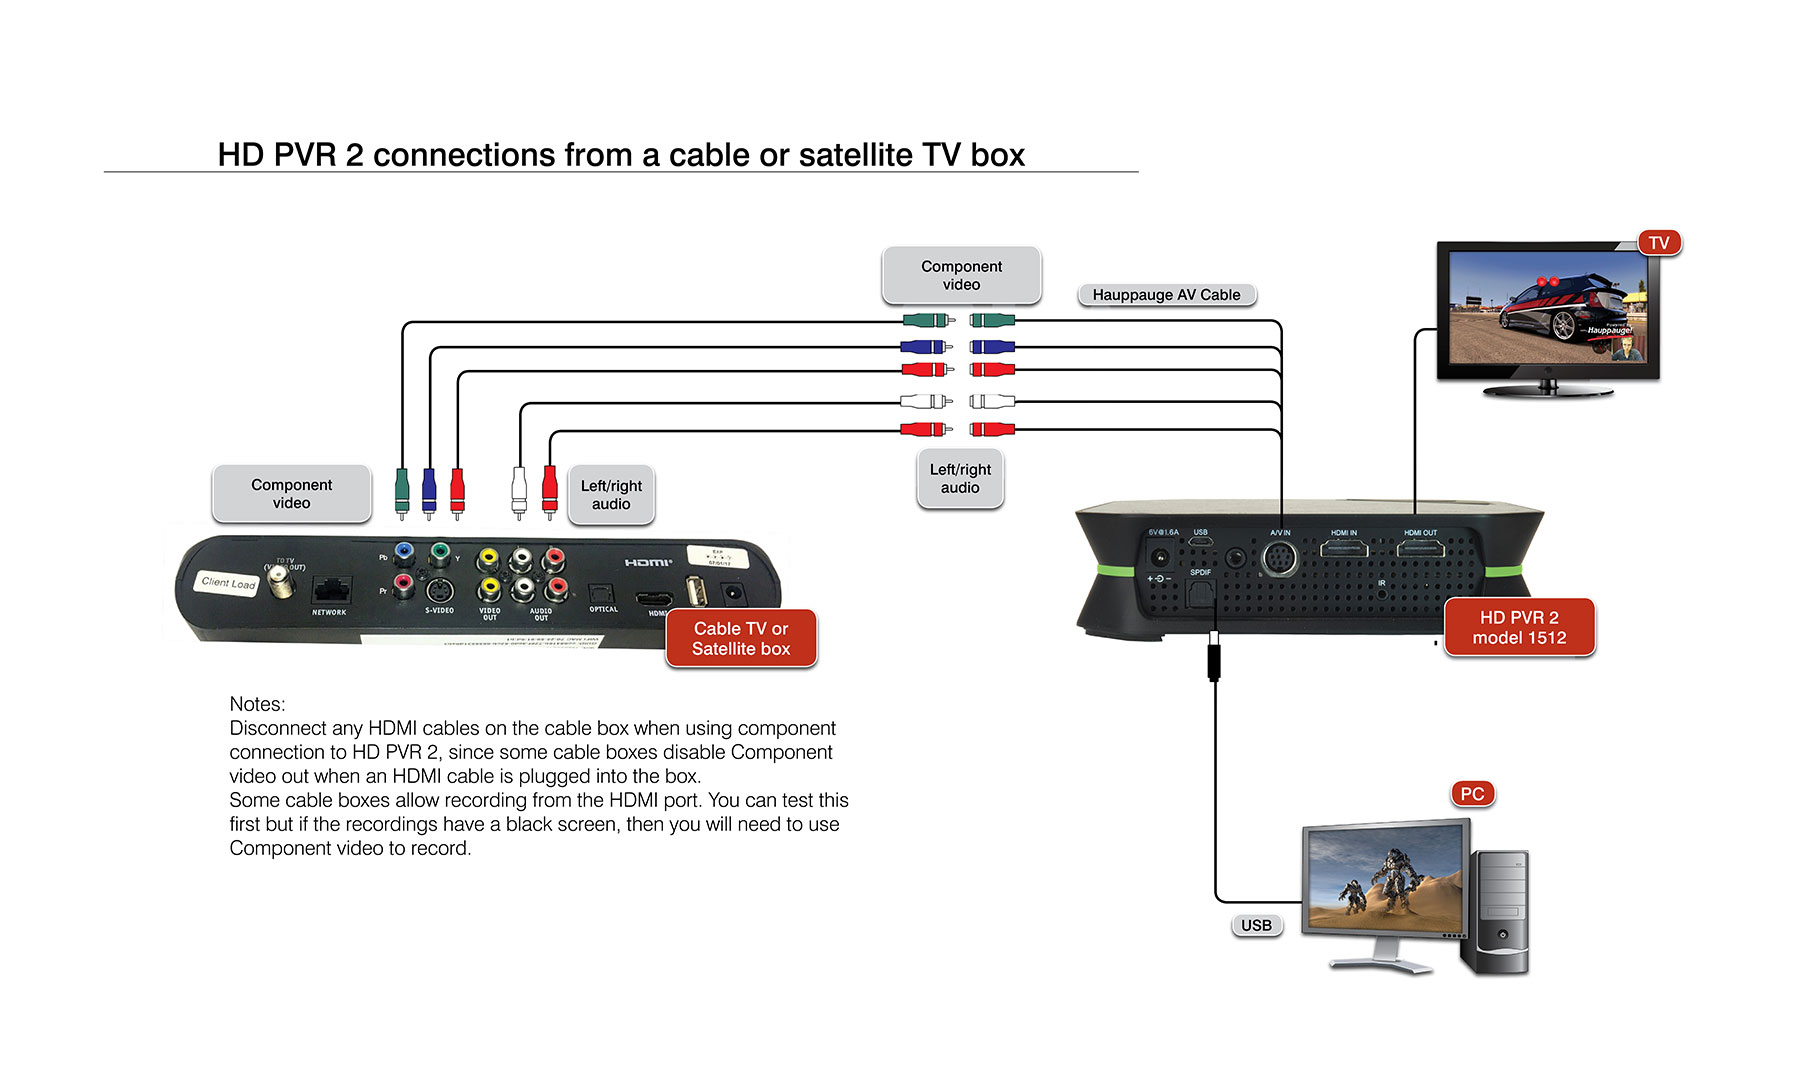
Connecting to a cable TV box
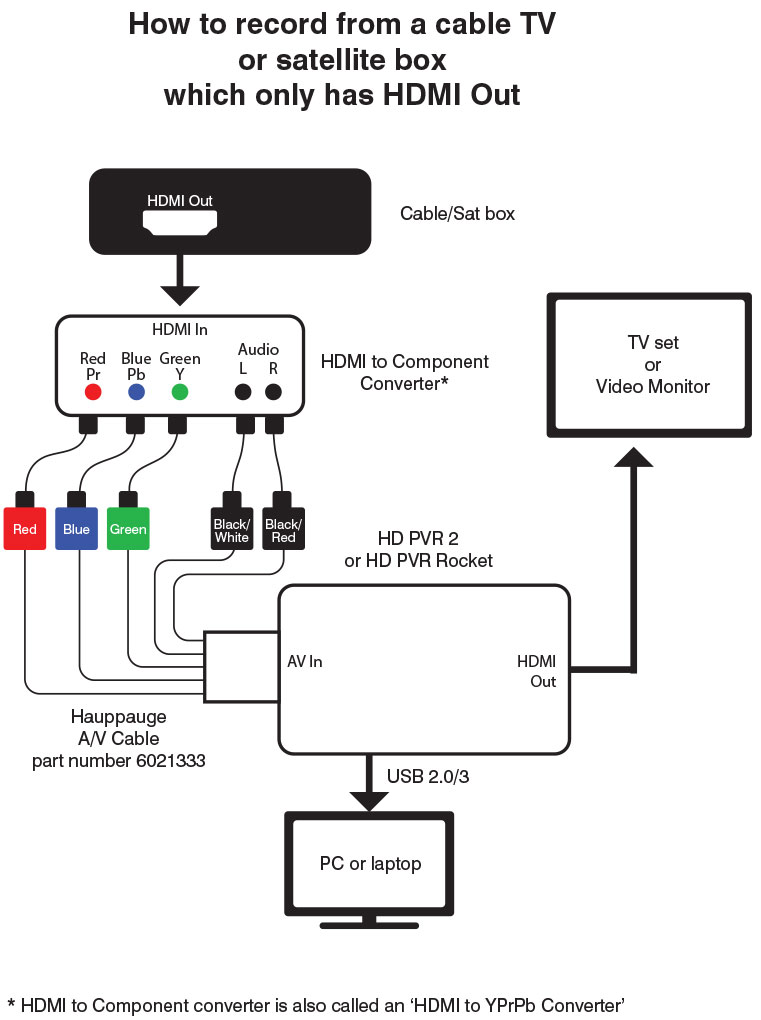
HDMI to Component Converter connection
Game recording connections
Recording your PC screen
Model numbers
model 01504: HD PVR 2 model 1504, with Hauppauge Capture for Windows and Capture recording application for Macs, optical SPDIF and 5.1 channel surround sound audio recording and passthrough
Bundled software applications
- Hauppauge Capture for Windows
- Record, Trim, Upload and Stream your game play
- Record and stream your game commentary with built-in audio mixer
- Facecam to add your webcam video to your recordings (requires a webcam and a minimum i3 CPU)
- StreamEez built in for streaming on Twitch, Ustream and YouTube
- Hauppauge Personal Logo application, to "burn" your logos into your recordings
- HDPVRCapture recording application for Macs (download from www.hdpvrcapture.com website)
- HD PVR 2 high definition H.264 personal video recorder, USB 2.0 with built-in record button
- 6V 1.6 amp power supply
- USB cable - 9 ft.
- HDMI output cable - 6 ft.
- Hauppauge A/V component adapter
- Hauppauge Capture application (download)
- HDPVRCapture for the Mac (download from http://www.hdpvrcapture.com)
- Quick installation guide
Note: HD PVR 2 will not record video from HDMI with HDCP copy protection.
Hardware specs
-
Hardware encoder
- H.264 AVCHD high definition video encoder, with record resolution to 1080p30
Recording datarate: from 1 to 13.5 Mbits/sec
Recording video formats: AVCHD (.TS and .M2TS) plus .MP4
- H.264 AVCHD high definition video encoder, with record resolution to 1080p30
-
Audio recording formats
- HDMI in with 5.1 channel AC-3 audio: your recordings will have AC-3 audio
- Optical audio in with 5.1 channel AC-3 audio: your recordings will have AC-3 audio
- Note: Hauppauge Capture capture has the ability to disable AC-3 audio from the A/V source
-
No delay HDMI passthrough
- HDMI in to HDMI out - up to 1080p60
- Component Video in to HDMI out - up to 1080i60
-
Input/output connections
- HDMI in, from HDMI sources without HDCP
- Component video in, with stereo audio
- S-Video and composite video in, with stereo audio (optional cable not supplied)
- HDMI output (no delay passthrough)
- USB 2.0 or 3.0 connection to your PC or Mac
- Size: 6 in wide x 6 in deep x 1.5 in high
- Power: 6V at 1.6 amps
- Weight: .75lb / .34 kg / 12 oz
-
Recording formats
- 1080p60p (recorded as 1080p30)
- 1080p50p (recorded as 1080p25)
- 1080i60
- 1080i50
- 720p60
- 720p50
- 480p60
- 480i60
- 576p50
- 576i50
System requirements
For Mac users
- HDPVRCapture application runs on Mac OSX 10.7 / 10.8 ( Intel 32/64bit only, no PPC support)
For Windows users
- Laptop or desktop PC with 3.0 GHz single core or 2.0 GHz multi-core processor
- Microsoft® Windows® 11, 10, 8, 7 or Vista (32 or 64-bit)
- USB 2.0 or 3.0 port
- TV set with HDMI input (optional)
- Internet connection (for software download and installation)
Note: HD PVR 2 will not record video from HDMI with HDCP copy protection.
StreamEez: stream your video gameplay with Twitch and YouTube
File name: streameezsetup_1_0_33029.exe
Date: Feb 24, 2017
File size: 151 MB
New features in this version
- For Twitch users: add your channel name and pause for a commercial break
- For YouTube users: fixes problems with YouTube recording of video streams
- Adds an automatic re-connect mode, to re-establish streaming when your Internet connection is momentarily lost
- Adds streaming support for the HD PVR Rocket
To install this version of StreamEez:
- Click on the download link. You will be given an option to Run or Save the file. Click Save to save the file in your Download folder.
- Run this file. It will install the StreamEez-Pro application plus the Windows driver.
- When finished running the update, you will be ask to restart your PC. Restart your PC
- While the PC is restarting, power cycle your StreamEez device to load the new firmware (remove power from the unit for a few seconds and then plug it back in).
- When your PC has rebooted, double click on the StreamEez-Pro icon.
- Under Source (upper left hand corner), make sure it is set to your Hauppauge device.
- If your cables are connected, you should now be able to stream with Twitch or YouTube.
Some tips on using StreamEez
- Step 1
- Before you change any settings, make sure you are Off Air and the Lock button is unlocked (just click on the button to unlock).
- Choose your Video Source. Xbox 360 normally uses HDMI while PS3 normally uses Component.
- Choose your Audio Source. Xbox 360 normally uses HDMI while PS3 normally uses Line.
- In Quality Profile, the default is High Bandwidth. Depending upon the uplink speed of your Internet service, you may need to change to Medium or Low bandwidth. A laggy or jerky stream means your uplink speed is too low and you need to choose a different Quality Profile.
- If you would like to preview your video in StreamEez, make sure the slider under the preview window is set to 'Normal speed'. You should now see your video in the preview window.
- Step 2
- Then choose your Stream Service, either Twitch or YouTube. ( You must have an account setup with the stream service you wish to use)
- In Channel, select Login. Enter your Login and Password. You will see a message "Gathering credentials" as we check your user name and password.
- Once your user name and password are confirmed, you will see the URL of your stream in the box "Copy stream link". If you click on the words "Copy stream link", the URL will be copied to the clip board.
- Step 3
- Leave the Network Connection as the default
- To start streaming
- To start streaming, click the red dot next to "Off Air." The indicator should be changed to "On Air" and you will now be streaming live over the Internet!
- Once you are On Air, you cannot change any settings. You need to stop streaming by clicking the green dot next to On Air to stop the stream.
Third Party applications for HD PVR 2
Capture4ME
Capture4ME is compatible with HD PVR 2. It is an easy-to-use application that focuses on the core goal of capturing video. The Capture4ME app has the ability to trim the beginning or end of a recording, and also an 'Upload to YouTube' function for those that want to share their videos online.HD PVR 2 Frequently Asked Questions
What Operating Systems are supported by the HD PVR 2 and Colossus 2?
Microsoft Windows 10, 8, 8.1, Windows 7 or Vista (32 or 64-bit), or Windows XP with Service Pack 2 or later.
There is also new Linux support for the HD PVR 2 and Colossus 2.
Do I need a PC to use HD PVR 2?
Yes, a PC or laptop is required to use HD PVR 2. The PC is used to both run the HD PVR 2 application plus is the place where HD PVR 2 recordings are stored. HD PVR 2 does not have any internal disk storage. HD PVR 2 connects to a PC or laptop computer through a USB 2.0 port. The HD PVR 2 recordings are stored on the PC's disk drive.
If you want to record your HD videos without a PC, you should use the HD PVR Rocket.
If you have a Mac, there is an application from HDPVRCapture which can be used. Go to http://www.hdpvrcapture.com for more information.
I use the HD PVR 2 Gaming Edition. I was wondering how I can record my commentary with game audio?
With the Hauppauge Capture application, you can plug your microphone into the 'mic input' on your PC. Hauppauge Capture will mix your game play audio with microphone audio. With Hauppauge Capture, there are seperate volume adjustments for game play and microphone audio. You can also add PC sound (music or Skype audio) to mix together PC audio with game audio and your game commentary.
https://www.hauppauge.com/capture
Here is a video which shows how to record game commentary with an Xbox 360
Here is a video which shows how to record game commentary with a PS3
In some cases, in order to have third party chat in your recordings and streams, you might need the Hauppauge Chat cable.
What types of video sources can I record?
The HD PVR 2 can record from HDMI (without HDCP), Component video and composite video. Video input resolutions can range from standard definition 720x480 up to 1080p60.
Common examples are:
- video cameras with HDMI out
- game consoles such as the Xbox One, PS4, PS3, Xbox 360
- PC Graphics cards (from the HDMI port on the graphics card) so you can record your PC screen
- cable or satellite set top box can be recorded from Component video and composite video. HDMI is often blocked with HDCP copy protection on cable and satellite boxes, so you should use Component (red/green/blue connectors on the back of your cable/satellite box) or composite video (the yellow connector on the back of your cable/satellite box) for best results. Some people have reported they can record HDMI from a cable/satellite box, but many boxes block the HDMI port with HDCP copy protection.
How can I watch my recordings on my TV set?
All recordings made by the HD PVR 2, Colossus 2, HD PVR Rocket and HD PVR Pro 60 can be played back onto a TV set using any of the following methods:
- Connect your PC to the TV set via HDMI: Run an HDMI cable from your PC and plug it into your TV set. Use Hauppauge Capture, Windows Media Player or other player like VLC to play your videos to your PC screen. You should see your recording also being played back to your TV set.
- Use a media player like the Amazon FireTV box: The Amazon FireTV box has a USB port on the back where you can play any of the HD PVR recordings. Copy your recordings to a USB thumb drive, plug it into the FireTV box USB port and then you can use 'VLC' media player (available on the Amazon store as an app) to play your recordings.
- Copy your HD PVR recordings onto a USB thumb drive, and then plug the thumb drive into the TV set and play your videos: If you make a recording using any HD PVR and copy that recording to a USB thumb drive, many new Samsung and LG TV sets have a USB port on the back where you can plug the thumb drive with your recordings. As soon as you plug in the thumb drive, the Samsung TV set will recognize the thumb drive and allow you to play recordings back to your TV screen.
I want to use my HD PVR 2 with OBS to stream retro game play. How do I setup OBS?
First, we assume that your retro gameplay is coming in from composite video (the yellow cable) and left/right stereo audio.
OBS by default uses HDMI audio/video, so you need to change the source in OBS to composite video and left/right stereo audio. If you have the Hauppauge Component AV Cable (Part number 6021333), connect the yellow jack from your video source to the Blue RCA jack on the Hauppauge AV cable.
Here are the steps to setup OBS:
- First, open Hauppauge Capture. In Hauppauge Capture under Video In, select Composite and under Audio In select AV In. Make sure you can see your retro game video in the Hauppauge Capture preview window. If not, check your cables. You must see video in Hauppauge Capture before you can move onto OBS
- Once you can see your video in the preview window, close Hauppauge Capture and open OBS
- The first thing to do in OBS is add a new Video Capture Device. In Sources, click the + and select Video Capture Device
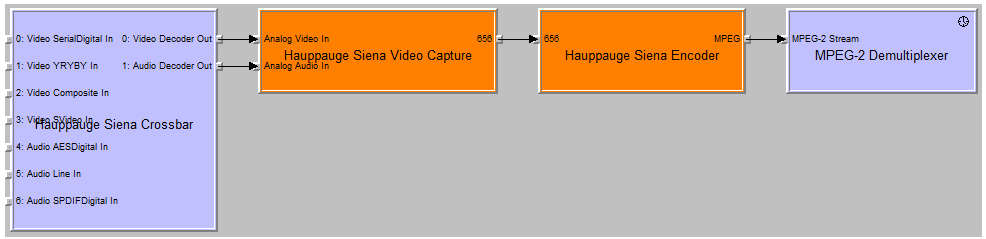
- Select Hauppauge Sienna Video Capture and click OK
- Next, click Configure Crossbar. A few seconds later you should see the video source setup for the HD PVR 2. Choose the source you are connected to, such as Composite In. You will have five choices: 0 Video Parallel Digital In which is HDMI, 1 Video YRYBY In which is Component video, 2 Video SVideo In which is S-Video, 3 Video Composite In for composite video and 4 Video RGB In
- Then finish the setup: click Apply, OK and then Deactivate, Reactivate and then OK
In about 15 seconds you should now see your composite video source in the OBS Preview window.
How to turn off HDCP on a PS4
- On the PS4, go to Settings: from the main user interface, push up on the DualShock 4 to reach the top-level of the system’s menu, and select the toolbox labelled ‘Settings’
- Enter the System submenu: When the long list of options appears, scroll down to the icon named ‘System’ and select it
- Turn off HDCP encryption: You’ll find another long list in Settings. Scroll down to ‘Enable HDCP’ and ensure that the box to the right of the label is not ticked. It will be enabled by default, so simply click on it to disable the irritating feature. If you have any applications open, the system will ask you to close them, so make sure that you’ve saved your game before completing this last step.
How to turn off HDCP on an Xbox One
The following is from the Xbox support site
- Restart your Xbox One console:
- Press the Xbox button on the console for ten seconds until the console turns off.
- Touch the Xbox button on the console again to turn it on.
- Try to play the content again.
- If your Xbox One console is in instant-on power mode:
- Go to the Home screen.
- Press the Menu button on your controller and select Settings.
- Go to Power & startup, then Power options.
- Select Power mode and then select Save Energy.
- Turn off the console by holding the Xbox button.
- Turn on the console by pressing the Xbox button, and then try to play the content again.
Problem: Playing premium content on your console establishes an HDCP connection with your television. Some unintended video and sound behavior may occur if you plug in a DVR or home entertainment system while the console is turned on.
To resolve this problem, try the following solutions:
I am getting squeaky audio when I record game commentary with my microphone. How can I fix this?
Sometimes the audio sampling rate of the microphone is not matched to the audio recording from the HD PVR 2. In order to match them up, set the sampling rate of the microphone to 48Khz. Here's how to do this:
- On your PC, go to the speaker icon on the right side of your desktop's toolbar, right-click the speaker icon and select "Recording devices".
- Then in the new window that opens, locate your microphone and the right-click it in the list and select the option "Properties". A new window called "Microphone Properties" will open.
- Go to the "Advanced" tab. There you'll see a section named "Default Format", click the drop down menu and select this from the list: 2 channel, 16 bit, 48000 Hz (DVD Quality). Then click apply, restart your PC and give the recording another try.
Can I record composite video or S-Video?
Yes. To record composite video with the HD PVR 2 or Colossus 2, simply connect the yellow connector from your video source to the blue connector on the Hauppauge AV cable. Then, in Hauppauge Capture, set the Video Source to Composite.
For S-Video, you will need to use the optional Hauppauge AV cable model 6021252 which you get purchase on the Hauppauge Webstore. Hauppauge Capture has a setting for S-Video.
Recordings from composite or S-Video are still made in the H.264 format.
I'm trying to record from a Nintendo Switch, but I'm getting a 'No HDMI signal detected' message. How can I fix this?
The basic problem is that the Switches HDMI resolution is not what the HD PVR 2 needs to sync up.
Do this:
- In the Switch settings System settings > TV output > TV resolution, change from 'Automatic' to either 720p or 1080p
- you must connect the power to the docking station before connecting the HDMI lead to the HD PVR 2
I'm not getting audio on my TV monitor, but I have audio in my recordings. How can I fix this?
Some users have reported that they get audio in their HD PVR 2 recordings, but do not hear audio on their monitor. We find that this is caused by the Hauppauge HD PVR 2 being able to accept AC-3 audio but the monitor is only two channel audio.
In Hauppauge Capture, go to the Advanced Settings -> Audio Encode and click the button which says 'Disable HDMI AC3 support'. This forces your video source to output 2 channel audio which should work with your monitor. Then power cycle all your devices: your game console or video source, your monitor and the HD PVR 2. When you power everything up again, the HD PVR 2 will report that it can only do 2 channel audio and you should now have audio from your monitor.
Can I connect the HD PVR 2 passthrough cable to a standard TV which does not have HDMI?
No. The HDMI output of the HD PVR 2 can only be used on an TV set with HDMI connectors. HDMI TV sets normally display 720p or 1080p video.
Can I use HD PVR 2 with a Mac?
If you buy the HD PVR 2 Gaming Edition Plus, it comes with a free copy of HDPVRCapture for the Mac.
If you have an HD PVR 2 or an HD PVR 2 Gaming Edition, you can buy HDPVRCapture separately. For more information, please go to:
www.hdpvrcapture.com.
What kind of webcam can I use to make Facecam videos?
Hauppauge Capture uses any webcam, either HD or standard definition, as long as it has a 'raw' YUV or YUY2 mode. MJPEG and other compressed formats are not used. Your webcam can be 4:3 or 16:9. Popular webcams include the Microsoft Lifecam HD-3000 plus, if you have a laptop, the built-in webcam.
Hauppauge Capture chooses the most suitable video mode supported by your webcam. You can set the size of the video, and the format (4:3 or 16:9) in the Settings menu of Hauppauge Capture.
System Requirements
Windows 10, 8, 7, Vista and Windows XP with service pack 3. Mac support from HDPVRCapture.com
You can record HD PVR 2 video on pretty much any PC. Older, slow, laptop or desktop PCs can be used to record HD PVR 2 video. Preview video on older PCs and laptops might be jerky and laggy but your recordings will be fine.
But when you playback an HD PVR 2 recording on your PC screen, you need a fast CPU and at least 256MB of graphics memory. Here is what we recommend for video playback (minimum):
- Dual core CPU 2.0Ghz or faster
- Graphics with 256MB memory (or greater)
- Sound card
- USB 2.0 Port
Can I record video from my old Nintendo, PS2 or Wii?
Yes. Connect the yellow cable from your console (Nintendo, PS2, Wii or any other game console which has a yellow composite video connector) to the Blue connector on the Hauppauge AV cable. Then connect the red and white audio cables from your Wii to the red and white connectors on the Hauppauge AV cable. Then, in Hauppauge Capture or Hauppauge Capture, select Composite under Video input and Line In under Audio input.
Here is a video which shows you how to use the HD PVR 2 with an Nintendo 64: https://www.youtube.com/watch?v=Mb541Ww09jg
Would you like to support the HD PVR 2 in your own Windows application?
You can access the HD PVR 2 in your DirectShow application. Simply build a Directshow graph and add the crossbar, capture and encoder filters. Then connect them all up, and it'll output a transport stream containing H.264.
You can then demultiplex it or do whatever you want to it. And you can use standard Microsoft API like IVideoEncoder to control the bitrate. Here is a link to the Graphedit graph.
Can I use the HD PVR 2 with Linux?
We are starting to test our Linux support for the HD PVR 2. You can get information on the Linux support for HD PVR 2 here:
https://www.hauppauge.com/linux
Can I use HD PVR 2 with the Hauppauge WinTV application?
Yes. WinTV v10, v8.5, V8, WinTV v7 and WinTV v 7.2 are compatible with all models of the HD PVR 2.
Can I record high definition TV from a Cable TV or Satellite box or DVR?
If your satellite or cable box or DVR has Component Video connections on the back of the receiver (normally Red/Green/Blue or marked YPrPb), then the answer is "yes".
By connecting the Component video output from your high definition cable TV or satellite TV set top box to the Component video inputs of the HD PVR 2, you will be able to record the TV programs coming from your set top box to the hard disk. Component video connections are normally the Red/Green/Blue connectors on the back of a set top box. Sometimes they are also called YPrPb or YCrCb connectors.
The HD PVR 2 goes between the cable or satellite box and the TV set. HD PVR 2 has component video in and HDMI out, so the connection to your cable or satellite box can be Component video, and the connection to your TV set is HDMI.
Note: the HD PVR 2 also has HDMI in, but from experience we find many cable and satellite boxes put HDCP copy protection on HDMI.
What type of recordings can I make with the HD PVR 2?
HD PVR 2 encodes in an H.264 format. It records in TS or M2TS file formats, which is a basic H.264 'transport stream'. Many people would like to know if the quality of a TS or M2TS recording is as good as an MP4 recording. The video quality of MP4 and TS files are the same. The primary difference between TS and MP4 files is that TS files are flat while MP4 files have an index at the beginning of the MP4 file. Otherwise, the video bits inside the files are the same and therefore the video quality of TS, M2TS and MP4 files are the same.
All record file types can be used to burn AVCHD Blu-ray compatible discs but you will need to supply your own disc burning application.
What type of audio encoding is made with the HD PVR 2?
There are two ways of bringing audio into HD PVR 2: through the Line In (RCA) stereo audio jacks on the A/V connector or through the HDMI connector. When bringing audio in through the stereo jacks, audio is recorded as MPEG 1 layer 2 audio. When bringing audio in through the HDMI connector, the audio is also recorded in the MPEG 1 layer 2 format.
DTS audio is currently not supported.
If you have the HD PVR 2 model 1512 or the HD PVR 2 Gaming Edition Plus and are bringing in 5.1 channel audio from either HDMI or optical audio, your recordings will be made with 5.1 channel AC-3 audio.
Can I output files I've recorded with my HD PVR 2 or other content from my PC back to an external TV monitor through the HDMI outputs on the HD PVR 2?
No, the HD PVR 2 itself does not have the ability to play back recorded videos to an external monitor. To playback recorded videos, you will need to connect your laptop or PC to your TV set.
The HDMI video output on HD PVR 2 acts as a pass through for live video streaming from your video source through the HD PVR 2 back to your TV monitor. The power of the HD PVR must remain in the on position in order to pass the video through to the external TV.
If I record my game play, can I uploaded it to YouTube?
Yes. Recordings made with HD PVR 2 are either in TS, M2TS or MP4 formats, which can be immediately uploaded to YouTube without conversion. Hauppauge Capture records from HD PVR 2 in an H.264 form which is used by YouTube. And the Hauppauge Capture Edit tab allows you to trim your videos very quickly without the need to re-encode.
I'm streaming my gameplay with YouTube, but I cannot get YouTube to record the videos. What am I doing wrong?
YouTube will not record your video streams unless you set a start time and an end time in your streams. If you simply start and stop a YouTube stream, YouTube will not record it.
Can my PC go into hibernate or sleep mode when using HD PVR 2?
The current Windows driver for HD PVR 2 does not allow your PC to go into Hibernate or Standby mode when it is either recording or previewing video.
Can I record my webcam while recording and streaming with the HD PVR 2?
Yes for recording, no for streaming. With the latest version of Hauppauge Capture, you can record your videos with a webcam in your recordings. This is called the 'Facecam' feature in Hauppauge Capture. Facecam allows you to specify the location and size of video from your webcam in your recordings.
I'm using a PS3 and I see a black preview screen in Hauppauge Capture. How can I fix this?
This happens if you connected your PS3 using HDMI and now want to use Component video so you can record with HD PVR 2.
To fix, you need to reset the video settings on your PS3. To do this:
- Make sure you have the HDMI cable disconnected on your PS3
- Then push the PS3 power button on the front of the PS3. You should see the light go Red. This means your PS3 is turned off.
- Then hold down the PS3's power button until you hear two beeps (one beep, then about 5 seconds and a second beep).
Your PS3 should now be set to Component video out and you should see video in the preview window in Hauppauge Capture.
How To Record Xbox 360 Game & Party Chat
- 1. Go to the Xbox Guide Menu
- 2. Go along to settings.
- 3. Select Voice.
- 4. Go down to voice output and select 'Play though both'. This will make the audio play out your TV and through your mic at the same time.
Depending on what game you are on, I highly recommend you turn down game volume as well as sometimes voice chat can't be heard because the game volume is too loud. However I guarantee that there will be a way to turn down your audio setting on whatever game you are on. Make sure you make it loud enough to hear, but quiet enough to make the voice chat clear and easy to hear.
I'm using a PS3, and the video in the Hauppauge Capture preview window has incorrect colors?
Most of the time this is caused by either one of the Component video connectors is not connected. For example, if the Red connector is not connected correctly, your video picture will look green.
Also try updating to the latest drivers supplied by your graphics card manufacturer.
I see a change in brightness every few seconds in Hauppauge Capture and Hauppauge Capture while recording, streaming or playing back my video recordings. But my recordings are fine. What is going on?
If you are running an AMD graphics card in the PC which the HD PVR 2 is connected to, you may experience a slight change in brightness every few seconds while in the preview or edit screens. This is due to an issue with hardware acceleration that we have seen in some AMD drivers. This shift does not affect recordings and typically can be eliminated by either changing drivers for the graphics card or by disabling Hardware acceleration.
Video is jerky or broken up while capturing, yet my recordings are perfect. Why?
This is caused by either a slow processor in your laptop or desktop PC, or the display adapter is having a problem. Make sure your video card meets the minimum requirements. Also try updating to the latest drivers supplied by the manufacturer.
In September 2012, there was a problem with the ATI graphics driver which would cause jerky video or freezing of the video screen. This should be fixed with an update from ATI on their graphics drivers.
I get a black screen in the preview window when using Component video from a cable TV set top box.
Some set top boxes will disable or turn off the component output if the HDMI or DVI output is being used. Check to see how you have your Television connected to your set top box. You might need to disconnect the HDMI connector on your set top box when you want to record TV programs.
Audio pass through does not work
In order for the audio pass through to operate, you need to configure the Audio settings in the Hauppauge Capture application. Click on the Capture tab. In the Audio input section, choose your audio source from the drop down menu ( RCA, HDMI ). Once configured, the HD PVR 2 will retain these settings. Note: the HD PVR 2 must be powered on for the pass through to operate.
My video recordings look pixelated with fast motion. What can I do?
Increasing the recording bitrate will eliminate motion artifacts in your recordings. In Haupauge Capture, in the Capture tab make sure Variable is selected. Than start with Quality set to 11 Mbits/sec. This should give you very good quality. You can continue to increase the Quality up to a maximum of 14 Mbists/sec.
You can experiment with other settings, but in our experience, these are good for uploading to YouTube.
What resolutions and bit rates are supported using the HD PVR 2?
- Video record resolutions are 1080p30, 720p60, 540p60, 480p60 and a number of downscale variants of these formats.
- You can record at datarates from 1Mbs to 13.5Mbs. If you choose Variable, the maximum recording datarate is about 1.5 times the selected rate. As an example, if you have Variable selected and set the Quality to 14Mbits/sec, the maximum rate will be about 21 Mbits/sec.
What file formats are created by recording with the HD PVR 2?
Hauppauge Capture records in a TS file or M2TS file directly. TS is also called 'AVCHD' and is the native format for Blu-ray DVD discs. Also, Hauppauge Capture has an Export to MP4 function, which adds an index to the beginning of a TS recording and creates an MP4 file. This usually takes just a few seconds and does not change the video quality of your recording.
How much disk space will it take up when recording?
Approximately 2 GB per hour at 5Mb/s setting.
Approximately 4 GB per hour at 9Mb/s setting.
Approximately 6 GB per hour at 13.5 Mb/s setting.
Can I use HD PVR 2 independently from a PC?
No, the HD PVR 2 requires a PC to operate. If you want to record without a PC, you should use the HD PVR Rocket.
If you are using the HD PVR 2, once you have connected your PC to HD PVR 2 and run Hauppauge Capture, you can disconnect the USB cable to your PC and the passthrough will continue to run as long as HD PVR 2 still has power.
Can I use a longer USB cable with my HD PVR 2?
It is not recommended to use a longer USB cable other than the 2 meter USB cable provided with the device.
Can I burn a Blu-ray disc with my HD PVR 2?
You can burn Blu-ray compatible discs, but a disc burner is not supplied with HD PVR 2.
What are the specifications for the power adapter that is included with the HD PVR 2?
The power adapter is 6V 1.6 amps.
Hauppauge Capture hangs during the installation. What can I do?
Check for the presence of "Constant Guard" from Exfinity. If present, uninstall it, then re-run the installation for Hauppauge Capture. Once installed you can reinstall Constant Guard.
How can I record party chat from the Xbox One?
Here's a tip from an HD PVR 2 user:
"With the Xbox One, to record game commentary I do this:
in Kinect settings, use the Kinect mic which forces the party chat to come out of the TV speakers.
The Hauppauge game recorder will then pick up the party chat when recording game audio.
In order to record your voice (which won't come through the speakers and be picked up), you need to have a Mic plugged in to your PC and place near your face as you do. Then make sure in Hauppauge Capture you select the mic in the drop down menu and set level.
Then you will get the game chat and the game audio recorded, and you speak to your party via Kinect microphone. Basically, one mic to chat with your party and one mic to record your game commentary."
How can I restart Device Central?
Device Central is a Windows service which monitors the record button on the HD PVR 2. Sometimes Device Central will close. If so, you can restart it by going to Windows Explorer and looking in ProgramFiles -> Hauppauge -> DeviceCentral and then running the program HCWDCTrayTool.exe
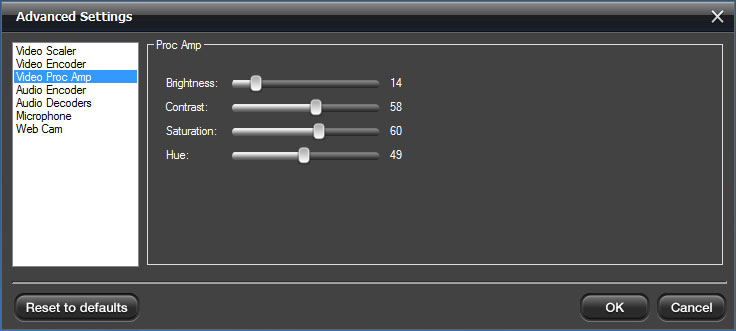
How can I adjust the color settings of my recordings
HD PVR 2 can adjust the color settings of both the recordings and the passthrough video.
To adjust the color settings, open Hauppauge Capture and go to the Capture tab. Then click the Advanced button at the bottom and go to Video Proc Amp. Here you will see the color and briteness settings.
Manuals
HD PVR 2 Gallery