Overview of the WinTV v6 TV window
WinTV v6 can be used with any WinTV-PVR TV tuner.
After the installation of the WinTV v6 application, you find see a shortcut "Hauppauge WinTV" in the Windows Start menu and the WinTV icon on your Windows desktop.
WinTV v6 controls

Basic control of WinTV v6:
- To remove the TV tools (called "No Title mode"), click your RIGHT mouse button once in the live TV area. To see the TV tools again, click your RIGHT mouse button once in the live TV area. In each mode, you can set the position and size of the WinTV window.
- Watch TV full screen: click the Full screen button. Click your RIGHT mouse button or hit the ESC key to exit full screen mode.
- Changing TV channels: Click Channel Up or Channel down. Or RIGHT click in the TV channel window which will display the current TV channel list for fast channel changing. You can also change channels by using the numbers on the keyboard or by pressing the letter on the keyboard for the channel name that you want to view.
- Record TV: click the red Record button (which is next to the TV channel window) to start recording. You can set a record timer but clicking the red record button once for each 15 minutes you'd like to record. When you are finished recording, click the TV button. You can automatically schedule a recording by using the Hauppauge WinTV Scheduler.
- Audio setting: RIGHT click the mouse button on the "audio type/language selection" you can change the available audio language settings of the current TV program that you are watching.
- Control menu: click the Menu botton, or RIGHT click and hold the mouse button (hold for 2 seconds) in the TV window, the control options are displayed.
WinTV Scheduler with built-in support for TitanTV
This version of the Hauppauge WinTV v6 Scheduler supports TitanTV, the web based TV electronic program guide.
To use TitanTV, go to www.TitanTV.com, and register, choosing your local TV provider. If you have a Hauppauge WinTV installed. simply click the Record button when viewing the details of any TV program.
Note: You need an internet connection to use titantv.com
Location Manager with QAM channel mapper
The Location Manager allows you to save a channel list, and give it a name. For example, if you are in Chicago and scan for TV channels, you can then save this list and call it 'Chicago'.
If you then visit Milwaukee, you can scan for channels and use WinTV, but when you return to Chicago you can use Location Manager to select the Chicago channel list.
The Location Manager also has a QAM channel mapper, which allows you to map QAM channels to the channel list from TitanTV. For example, let's say you scan for QAM channels and find that channel number 2703 is really CNN. You can use the QAM channel mapper to tell the Scheduler that when you click on CNN in TitanTV, that CNN is found on QAM channel 2703.
Click here for instructions on using the QAM mapper.
Note: You need an internet connection to use the QAM channel mapper.
Name: hcwlocmgr_setup.exe
Version: 2.0.27029
Zap2It EPG plug-in for WinTV Scheduler
This is a third party plug-in for the Zap2It Electronic program guide, and uses the WinTV v6 Scheduler.
This EPG has support for the U.S. and Canada.
To use this guide, go to www.Zap2It.com and register using your Zip or Postal code. Then, click on TV Listings. When you see a program you want to record, click the program listing and then click 'Record to WinTV'.
Note: to uninstall this plug-in, use the Add/Remove programs from Control Panel. Make sure you have Explorer turned off before you try to uninstall this plug in.
Note: you need an internet connection to use Zap2It.
Name: epg_for_haup_1.00.04.exe
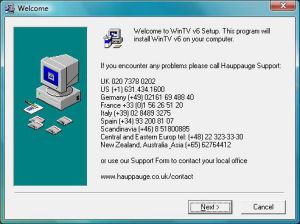
Installation instructions for the WinTV v6 CD
Note: WinTV v6 is compatible with all WinTV-PVR products. In 64-bit versions of Windows 7 and Windows Vista, the WinTV-PVR-150, WinTV-PVR-250, WinTV-PVR-350 and WinTV-PVR-500 require the use of less than 4GB of memory.
Installation note:
A valid WinTV application CDROM will be needed to install this WinTV v6 version. Any WinTV-NOVA version 4x, WinTV-PVR, WinTV version 6 or WinTV v7 application CD can be used during the install. If you do not have your original WinTV CD-ROM but would like to update to this WinTV v6 version, you can purchase a new CD on the Hauppauge webstore.
Supported WinTV products:
This version of WinTV v6 is for the WinTV-PVR and analog WinTV series of products. It can be used with the following WinTV products:
In addition, WinTV v6 can be used with the European equivalents of the above models.
Note: This is a single file which includes the driver, the driver update, middleware, video decoder and WinTV v6 applications and all accessories. This file is larger than the individual pieces, but should be easier to install since it is in one file.
Note: this package is for Windows XP, Windows XP Media Center Edition, Windows Vista and Windows 7.
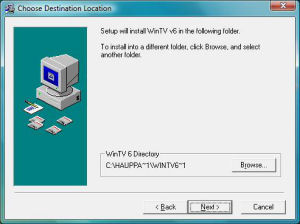
Installation Procedure
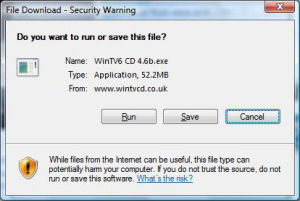
Step 1 - Software download |
|
Please click on the download link from your products support page, you will be given an option to Run or Save the file., |
 |
Once the file has finished downloading, the self extracting wizard will begin: |
 |
Click Next then select a path where you wish to extract the files (we recommend leaving this at its default setting), the Hauppauge software and drivers will be extracted automatically to your computer. |
 |
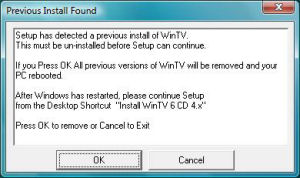
Step 2 - Previous software removal |
|
If you have a previous version of the software installed you will be prompted to uninstall it, click OK to automatically do this. |
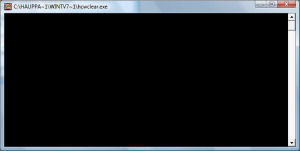
 |
The 'HCWClear.exe' application will start up and begin uninstalling the previous software, any error messages or notes will be shown in the black box. |
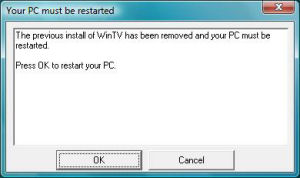
 |
Once complete you may need to restart your computer, press 'OK' to automatically restart your computer. |
 |
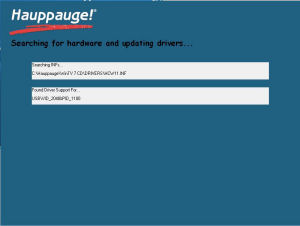
Step 3 - Installation of the drivers |
|
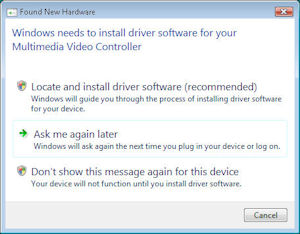
After Windows reboots, you will see the Windows Found New Hardware Wizard, please select 'Ask me again later' in Vista or simply cancel this wizard in XP (it may appear several times, repeat this each time the wizard is shown): |
 |
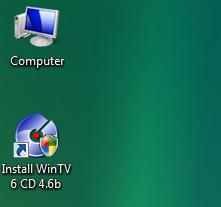
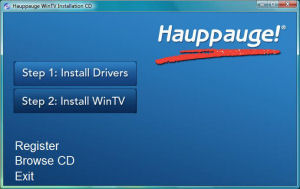
Once you are at your desktop, double click on the link to the install application: |
 |
This will open up the Hauppauge install application, click 'Step 1: Install Drivers': |
 |
This will then open up our driver installation program and automatically start installing the drivers for your product: |
 |
Once complete click on the bar to continue. |
 |
Step 4 - Installation of the WinTV Software and other applications |
|
In the Hauppauge installer you will now need to click 'Step 2: Install WinTV': |
 |
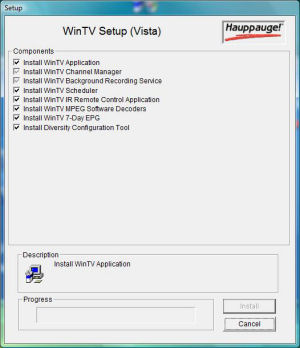
Select the language you wish to install from the list. Note: If you wish to customize the install list click on 'Custom Installation'. |
 |
The applications relevant to your product will now be shown and will begin to install: Note: Installing may take some time as it is updating other system components, please be patient. Once complete click 'OK' then click 'EXIT'. |
 |
WinTV version 6 users manual
WinTV version 6 users manual
Updated: October 15, 2007
Prodinfo: get information on your Hauppauge TV tuner
Prodinfo.exe is a program you can run which will extract information about the WinTV product you have installed such as model and serial number, MAC address, revision, and features which can be used to identify the exact model of your product. The driver for the device must be installed in order to run Prodinfo.exe
HCWClear
HCWCLEAR.exe is a program you run to remove all driver and files that were installed with the installation of the WinTV program.
WinTV v7 Frequenty Asked Questions
Using the WinTV6 Application
Basic operation
Channel changing
You can change channels by using the Channel Up or Channel Down buttons on the WinTV.
You can also type a channel number (for example:27) and WinTV will tune to that channel.
Volume change
With the slide bar on the top left hand side of the WinTV application window you can change the Volume level. Alternatively you can use the keypad on the keyboard <PgUp> for volume up or <PgDn> for volume down.
Sound on / off
To mute the sound on or off click on the green button below the slider bar. Alternatively you can use the keys on the keyboard <CTRL> + <M>.
Last channel
Clicking the “last channel” button will allow you to quickly change to the last viewed channel.
Surf preview
Clicking on the button "Surf" will show up to 16 still image preview of TV channels that you have scanned. The screen will gradually fill and double clicking on one of the preview images will show the selected channel in full screen.
Always on top
With Always on Top, WinTV will always be visible on your Windows desktop on top any applications. To turn on, click the Always on top button. It will turn green. To turn off, click this button again. A convenient way to use Always-on-Top is to make the TV window in the no-title mode small, and to make the TV window in the title mode larger. Then you can switch very quickly from a small window to a larger one by clicking the right mouse button.
TV mode
Click on the button "TV mode", in order to watch television in the full screen TV mode. With one click to the right mouse button or press the <ESC> key to leave TV mode.
To hide the WinTV toolbar (No-title mode)
Click your right mouse button in the WinTV’s video window for the no-title mode. To restore
the toolbars (the title mode), once again click your right mouse button in the video window.
You can set the size of the window differently in each mode.
Freeze picture
Click on the button Freeze, around the picture "to freeze". Clicking on Freeze will un Freeze the picture.
Snapshot
Clicking on the “Camera” symbol will take a snapshot still picture of the Video window that you are viewing. A "Thumbnail" (preview made smaller) of the still image of the video window will appear in the snapshot preview border. Double click on the "Thumbnail", to see it in full size. Now you can save the picture using option in the menu "file"/"save under..." on your hard disk. Clicking the Button CFG allows you to configure the snapshot function.
Saving several snapshots at the same time
Highlight the first image and then hold down the <SHIFT> key on the keyboard and then highlight the subsequent images that you want to save. Once you have selected the images that you want to save release the <SHIFT> key and then right click on a image to select the SAVE to file option.
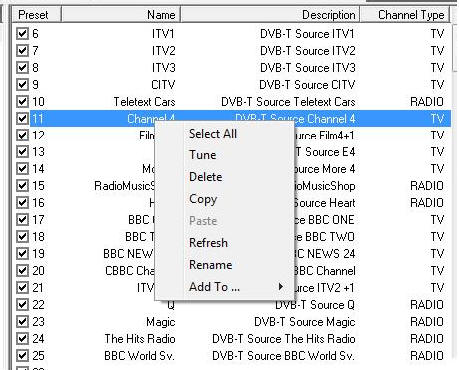
Channel Menu
To display the channel configuration menu <right> click with the mouse button on the TV window:
The channel configuration allows you to configure using the following options:
- Position the mouse pointer on the channel that you want to select and click the <Left> hand mouse button to select.
- Use the <Up> and <Down> and <Left> and <Right> arrow keys on the keyboard to select the different sub-menu that you want to select and press Enter / Return
- To select a channel list of either TV or Radio you can filter for either TV or Radio channels to be show in the channel list. The channel can also be selected by pressing the 1st letter of the channel name on the keyboard.
How to set up TV channels
On the WinTV v6 application, click on the MENU button.
Click on
“Suite Manager” to open the WinTV Channel Manager.
The Channel Manager has tabs for "Scan", "Sources", "Devices" and "Channels".
NOTE: To save your WinTV channel list, you may save the file HcwChanDB_5.mdb (which is located in the C:/users/public/wintv:for vista/windows 7 or C:\Documents and Settings\All Users\Documents\WinTV: for XP) into a temporary folder, and copy this file back into the WinTV directory after any re-installation to preserve your channel list.

Scan for Analog channels
This section refers to analog TV from cable TV or a TV antenna.
To scan for analogTV channels, click on the Sources tab.
Under Input Sources, click on Analog Source.
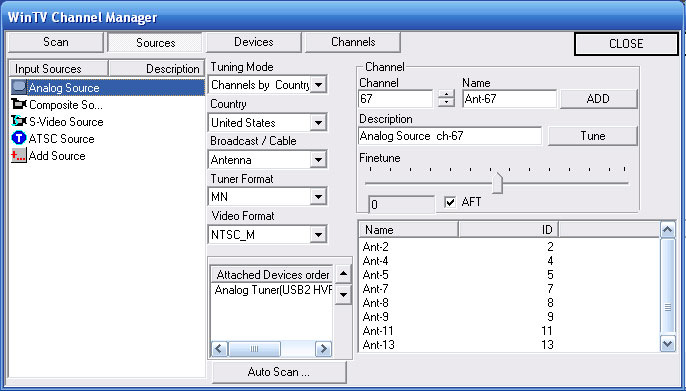
Automatic scanning for channels
Set the Country and Source (i.e. Cable TV, Antenna, HRC), then click Autoscan. WinTV will scan through the possible channels and list those where a video signal is detected.
The channel frequencies will scan from 1 to 69 for antenna, or 1 to 125 for cable. When channels are found they will be listed and the scanning will continue. After the completion of the channel scan a new window of an overview of the scanned frequencies and the number of found programs are will be displayed.
With an analog source, you may uncheck the AFT box to disable "automatic fine tune", and control fine tuning of the channels frequency by moving the slider (this control has a range of +127 to -128 db). Once you complete your fine tuning settings, you must click the Add button, which will add this frequency as a new channel into the WinTV suite manager. You can then delete the original channel if you are replacing it with the newer fine tuned one.
Tuning Mode provides two settings - one lists channels by country; the other lists all channels. The Broadcast/Cable item selects the appropriate Tuner mode for your input signal. Video Format and Country items select area of operation; WinTV provides all major video formats
Note: WinTV will be unavailable during the scan process.
You can track progress at the Channel Dialog's upper right corner. When the process is finished, all available channels will be displayed in the Channel Dialog.
Unwanted Channels may be deleted from an input source by simply selecting them and pressing the Delete key from the channel list menu.
Manual channel search
You can shorten the channel scan if you know the channel numbers for your local transmitter by entering the numbers into the channel number and click on Tune.
Scan for ATSC or Clear QAM digital TV channels
Note: This section refers to products with an ATSC/Clear QAM tuner (WinTV-HVR series).
Under Input Sources, select the ATSC Source or Clear QAM Source. ATSC is the digital TV format from "over-the-air" digital TV in North America. Clear QAM is unencrypted digital cable TV.
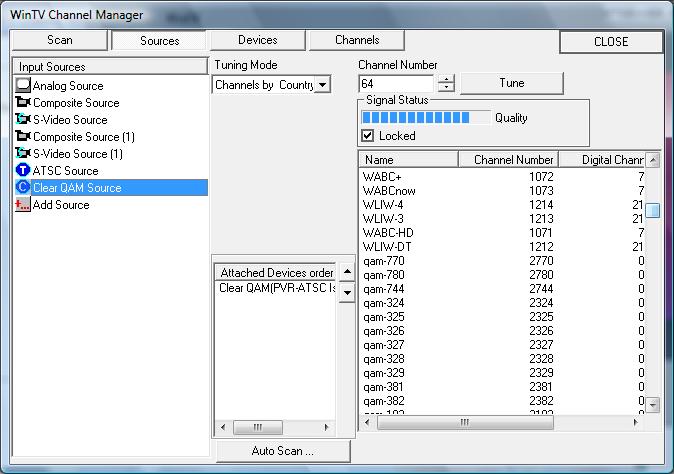
Automatic channel search
Click the <Autoscan> button to start the search for ATSC channels, ensure that you have selected your country location. The channel search will count from 1 to 125 and when a signal is found the box locked will have a tick.
Manual channel search
You can shorten the channel scan if you know the Multiplex Channel Numbers for your local digital transmitter by entering the numbers into the Channel Number and click on Tune
NOTE: To save your WinTV channel list, you may save the file HcwChanDB_4.mdb (which is located in the C:\Program Files\WinTV directory) into a temporary folder, and copy this file back into the WinTV directory after any re-installation to preserve your channel list.
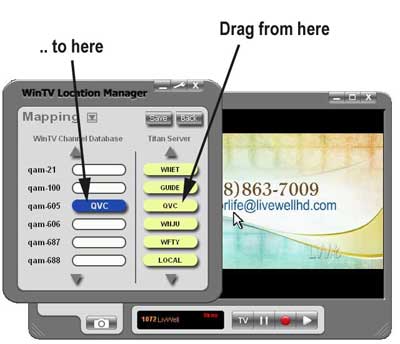
QAM channel mapping
The Location Manager also has a QAM channel mapper, which allows you to map QAM channels to the channel list from TitanTV. For example, let's say you scan for QAM channels and find that channel number 2703 is really CNN. You can use the QAM channel mapper to tell the Scheduler that when you click on CNN in TitanTV, that CNN is found on QAM channel 2703.
To install:
- Download the Location Manager and run it.
- Open WinTV v6.
- Click on the Menu button. You will see the Location Manager and QAM Mapper which is the QAM channel mapper.
To use the QAM channel mapper
- Open WinTV v6 and click on the Menu button.
- Click on QAM Mapping
- Enter your Zip code (currently the QAM mapper only works in the U.S.) When you click 'OK', the QAM mapper will retrieve the channel listings for your Zip code. This takes about 1 minute.
- You then need to select the service type (satellite, digital cable, etc.) and the cable TV provider you are using.
- Then click the Mapping button.
You will see two columns. The left column is the channels as they have been scanned by WinTV v6. The right column are the channels which are used in the TitanTV Electronic Program Guide.
Now you can associate the scanned channels to the TitanTV EPG channels so you can use TtitanTV to schedule recordings on QAM channels. For example, let's say that WinTV v6 channel 'qam-605' is really QVC, and you want to schedule QVC recordings from TitanTV.
You would then find QVC in the TtitanTV column, drag and drop it on qam-605. Then, click Save.
Now, when you schedule a recording on QVC using TtitanTV, the Hauppauge WinTV Scheduler will switch to QAM channel 605 for the recording.
Setting up an external audio/video source to the WinTV
Configuration a Video Input
When connecting a external source to the WinTV, please ensure that the cables are connected in the correct order.
Note: This section refers to WinTV products with Video Input.
Connecting WinTV to a VCR, camcorder, or a satellite or cable TV set top box
If your VCR or Set top box, such as a satellite TV set top box such as a DirecTV box or a SkyTV box, has a S-video output and your WinTV product has S-video input ,then you can use a S-video to S-video cable. This connection will give you the best video quality for analog video.
For sound input, you will connect the Red and White RCA jacks on your set top box to the WinTV. Some WinTV's have separate Red/White RCA jacks. Others have a 1/8" stereo jack. If your WinTV uses Red and White RCA jacks, use RCA cables (readable available at most electronic resellers). If your WinTV uses a 1/8" stereo input jack, you will need a 1/8" stereo to Red/White RCA jack adapter. This can also be found at most electronic retailers.
Connecting WinTV to Sony PS2, PS3 or XBox360 (or any other game device)
On WinTV products with built-in hardware MPEG-2 encoders, there is a slight lag between the game input and what you will see on your PC screen. If you are recording the video game, this will not matter. But if you intend to use your PC screen to play the video game, you might find this effect to be problematic.
For the video input to the WinTV product, S-Video will give you the best video quality for analog video. For sound input, you will connect the Red and White RCA jacks on your game to the WinTV. Some WinTV's have separate Red/White RCA jacks. Others have a 1/8" stereo jack. If your WinTV uses Red and White RCA jacks, use RCA cables (available at most electronic resellers). If your WinTV uses a 1/8" stereo input jack, you will need a 1/8" stereo to Red/White RCA jack adapter. This can also be found at most electronic retailers.
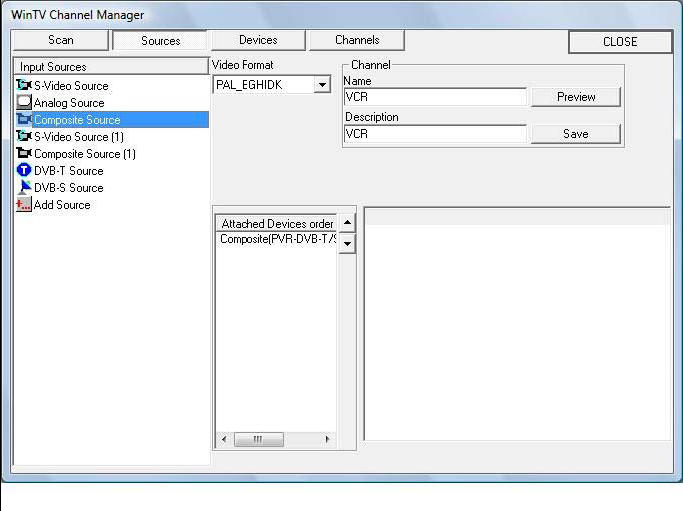
Configuring WinTV to use the external S-Video or Composite audio/video source
- On WinTV v6, click on the MENU button and then click Suite-Manager to open the WinTV Channel Manager
- Select the Sources tab and highlight the video source you are using to connect to your external source, either Composite or S-video source
- Set the Video Format. In Europe, the video format is Pal-BGHIDK. The video format used in North America is NTSC
- Type a Name for the channel in the field 'Name' and a description
- Click on <Save> and <Close>
Select this channel and you will have audio and video from your external source.
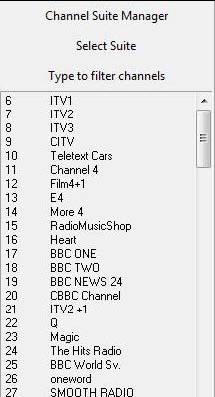
Changing the Channel List
Click on the Button MENU and “Suite-Manager” to open the channel manager. Select the <Channels> tab.
Channel Delete
To delete a channel you can either highlight and channel and the right click and select delete or highlight the name of the channel and press the “DELETE” key on your keyboard. In order to delete the full channel list you can <Select All> and then delete.
Channel Rename
To rename a channel you have to highlight it and then click on the column “Preferred Name”.
You can then edit the name of the channel.
Channel Number Location
- Highlight the channel that you want to change in the column “Preferred Number”. You can now enter a new number that is not already assigned to another channel.
- To move a channel up or down the list, highlight the channel and then click on the “Move Channel (UP/DOWN) entry.
Favorite channel list
You have the option of creating a favorites channel list in the order that you want. Simply click on the channel name on the right hand side and drag the channel name to the left on top of the Favorite group on the left hand side window.
Creating a new favorites group
You can also create a new channel suite if you prefer to create a new favorites group. Click on the Add Suite and type in a name for the new suite. If you then highlight “All Channels” you can then drag the channel on the right hand window into the new suite that you have created. This is useful if you only want some channels to be shown in your TV channels list.
Menu Options
Clicking on the “MENU” button will give you the following options:
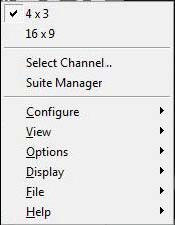
“4 x 3”
Select the TV picture aspect ratio 4 x 3.
“16 x 9”
Select the TV picture aspect ratio 16 x 9.
“Select Channel”
Select the channel that you want to view.
“Suite Manager”
Opens the channel suite manager where you can scan for channels and configure video input.
"Configuration” Menu
Allows you to configure the “Channels...”, “Audio”, “Snapshots...”, “Preferences...” and “MPEG Settings”.
“View” Menu
Allows you to set the TV image screen size to a pre-defined size (320 x 240, ..., 800 x 600).
“Options” Menu
To select the option ensure that the tick is selected before the name of the option.
“Select suite”
Allows you to select a specific suite (TV, Radio or favorites), you can also select your own created suite.
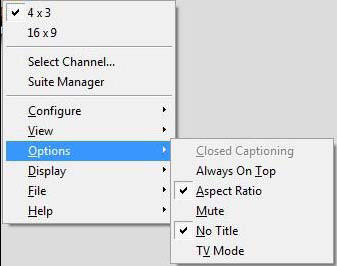
Options - Always on Top
Always on top will always make WinTV be visible on your windows desktop, it will be on top of any application.
Options - Aspect Radio
This option will force the aspect ratio to 4 x 3.
Options - Mute
Will Mute and un-mute the sound.
Options - No-Title
This option will remove the TV applications borders, so you will only have the TV picture.
Options - TV Mode
This option will change the TV picture to Full Screen mode, so the TV picture will cover the whole of the desktop.
“Display” Menu
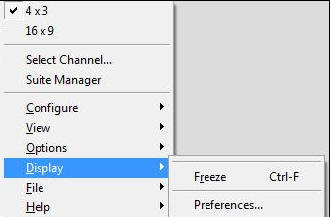
Display - Freeze
Will stop the TV picture from moving. You can also press: <CTRL> + <F>.
Display - Preferences...
Allows you to configure the “WinTV Preferences”.
“File” Menu
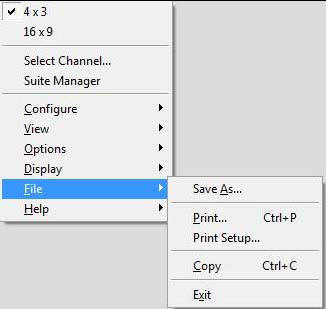
File - Save as
After using the “Snap” button you will be able to save that still image snapshots to different file formats (e.g. Jpeg, BMP etc).
File - Print...
Allows you to print out the still image snapshot.
File - Print setup
Allows you to configure the printer settings.
File - Copy
Allows you to copy the still image snapshots to the clipboard of Windows.
File - Exit
Will close down the TV application. You can also press <Alt> + <F4> on the keyboard.
“Help” Menu
Help - Help Topics
Opens the online help menu.
Help - Tip of the Day
Shows the tip of the day for useful information about the application.
Help - About
Shows information about the application version files and hardware.
WinTV Settings
Click the Configuration button on WinTV to see the WinTV Settings menus. There are three tabs: View, Movies and Snapshot.
View menu
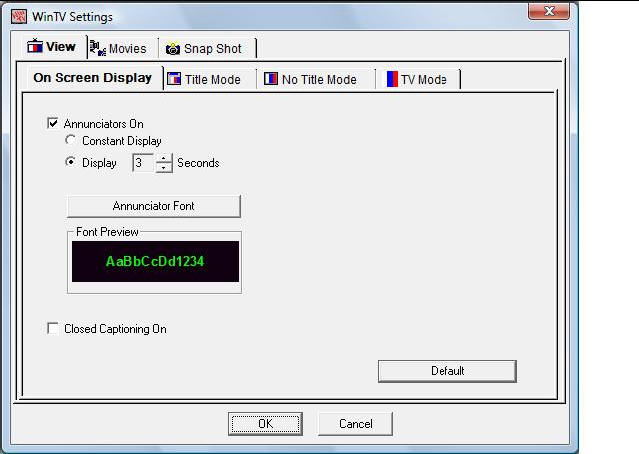
On Screen Display
The “On Screen Display” allows you to set the amount of time the information bar will be displayed on the screen. The annunciator font allows you to change the font type and color that will be used.
Tab - Title mode (TV picture with application Menu)
4:3 Aspect Ratio
The option "4:3 aspect ratio" determines whether this is automatically selected, if you re-size the WinTV window with the mouse.

Enforce Aspect ratio
When checked, the image's aspect ratio is preserved as the WinTV window is scaled. Selecting Enforce Aspect ratio will round off the height and width dimensions of the television image in order to maintain the proper aspect ratio. WinTV can operate as a Screen Saver, or can retain your current Screen Saver. If Allow Screen Saver is checked, choosing the "Use System Screen Saver" option uses any current screen saver configuration on your computer. Choosing TV Mode uses WinTV (in full-screen mode) as the system screen saver.
Tab - No Title mode (TV picture only)
No Title Mode Displays the Television inside the application window, without Title and Menu bars. This configuration dialog provides Aspect Ratio and Screen Saver settings as described in Title Mode (above).
Tab - TV Mode (Full screen TV)
TV Mode displays the television image using the entire height and width available to the monitor screen.
Movies menu

DVCR Record File Path
Refers to the folder of the recorded video files.
Pause Mode Record Path
Refers to the temporary path of the file that is buffered during the pause mode.
Pause Buffer
This sets the maximum size of the Pause Buffer.
Quality Level
Allows you to set the quality level of the recorded MPEG files files, example “DVD 6Mb” for analog recordings.
Note: For digital TV recordings of ATSC, clear QAM, DVB-T, etc. WinTV records using the actual digital format. You will see "DVD 2048 bytes" which refers to the native video quality.
Snap Shot menu
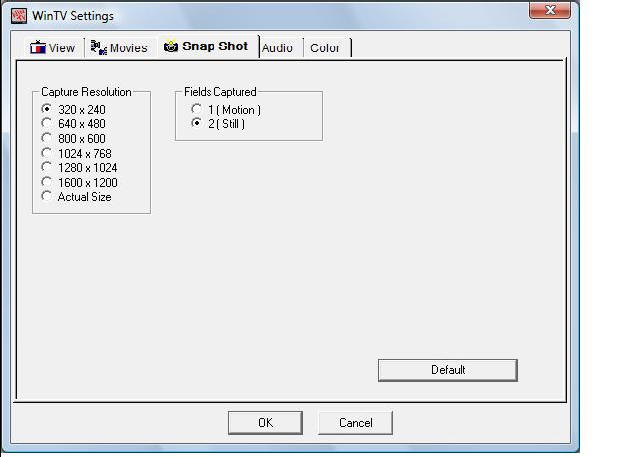
Clicking on the CFG icon allows you to configure the Snapshot settings:
Capture resolution
Capture Resolution Images in WinTV are captured at the maximum resolution. When the image is saved to a file name (below), you select a resolution for the snapshot, from 320 x 240 (minimum) to 1600 x 1200 (actual size).
Fields Captured
Fields Captured Broadcast video uses an interlaced format, in which the odd-numbered scan lines and even-numbered scan lines are displayed separately; the eye combines them into a smooth image. On the computer monitor output,, both fields are displayed at once. When taking a snapshot of a video image with little motion, Capture 2 Fields produces the most data and the clearest image. However, when taking a snapshot of a video image containing motion, capturing both fields may result in a blurred image. Therefore, use Capture 1 Field for best results.
Experiment with these settings to achieve the desired results.
Default
Button Resets Snapshot Configuration to factory defaults.
Audio Settings
Note: This option is only available on a WinTV product that supports this feature and will only be displayed if you are tuned into a channel or video input that supports this feature.
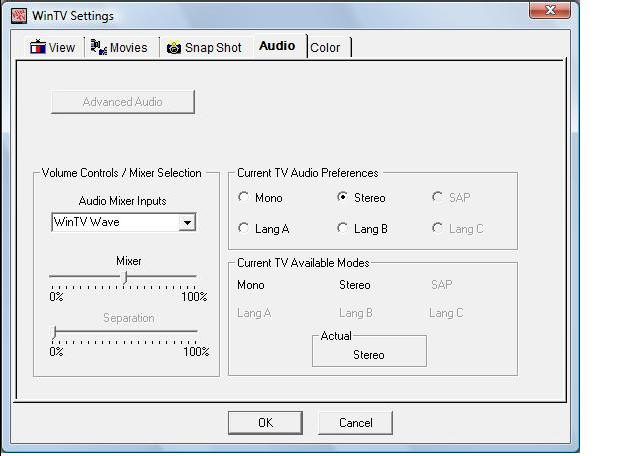
Audio Mixer Inputs
Click on this item to display a list of possible selections: WinTV WAVE should be selected.
Current TV Audio preferences
This area enables you to select audio preferences, from the source dependent Available
Modes listing at the bottom of the dialog box.
Current TV Available Modes
The actual (active) setting is highlighted.
Color Settings (analog only)
Note: This option is only available on a WinTV product that supports this feature and will only be displayed if you are tuned into a channel or video input that supports this feature. Not available for ATSC or Clear QAM channels.
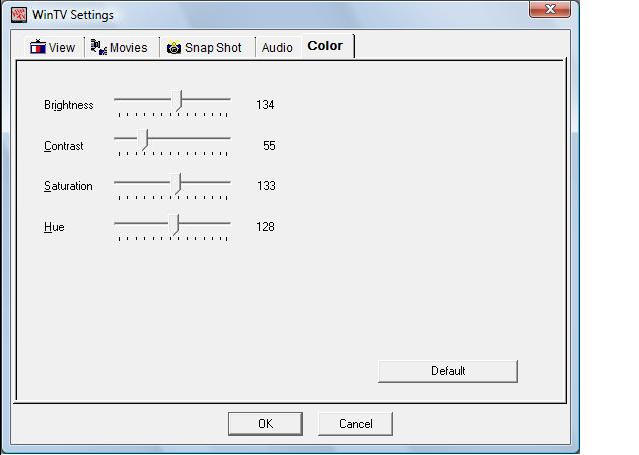
Here the brightness, the contrast, the saturation and hue can be changed for improving the picture quality for analog sources. Selecting default changes the settings back to default settings.
Pause, Record, and TV mode
There are four buttons to control the Watching, Recording and Pausing of TV.
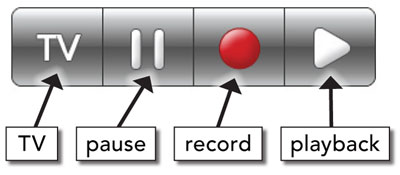
Clicking on the Pause button will cause the Pause menu to roll down from the WinTV application, while clicking on the Record button will cause the Record menu to roll down.
Clicking on the Record will start a recording of the channel that you are watching. If you click on the button once, it will record for 15 Minutes, clicking twice will record for 30 minutes, clicking a third time will record for 45 minutes. Each click will record for another 15 minutes
(So 3 clicks will record for 45 minutes).
Background Recording
The background recorder (BG recorder) allows you to record your program without the WinTV application opened on your desktop. When the background record starts; a red bullet icon close to the Windows clock starts. You can end the recording by right clicking on this icon and selecting terminate recording.
Click diagram to enlarge.
Time counter
The time is specified in a Hour:Minute:Second format..
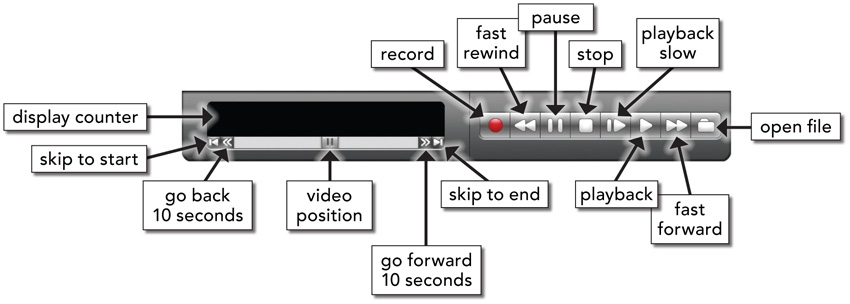
 Record
Clicking the Record button will automatically generate a file name and start recording your audio/video program.
- The Live TV window will be shown in the TV window
- The time counter will indicate the length of recording
- When recording using One Touch Record then length of the recording will be shown.
The quality of the recording and the hard disk space can be specified by clicking the symbol
Preferences//Movies/MPEG. If you click on "stop", the timer counter is put back to 00:00:00.
 Stop
Stop
Clicking the Stop button will stop the video you are recording or playing back.
 Play
Play
Clicking the Play button will playback from disk the last video file created. When playing a video, you can rewind, fast forward, replay 10 sec or skip forward 10 sec using the buttons on the control bar.
 Pause
Pause
Clicking the Pause button while Playing will pause your audio/video.
 Rewind
Clicking the Rewind button will play the video file in reverse. Clicking the Rewind button again will continue the playing of the video.
 Fast-Forward
Clicking the Fast Forward button one time will fast Forward your video at 2X speed. Clicking the Fast Forward button two times will fast Forward your video at 8X speed. Clicking the button again will continue playing back at normal speed.
 Slow Motion
Clicking the Slow Motion button during playback will cause the video to play in slow motion. Clicking the Slow Motion button again will return the video to normal playback speed.
 File
File
Clicking the File button opens the File menu. The last file recorded is listed in the File name box. In the File menu you can:
- Rename your recorded video file: To rename a video file, find the file you would like to rename, highlight it with your mouse, and click and hold the right mouse button. Go down to
- Rename and then you can type in a new name. Remember: You must keep the MPG extension on the file.
- Play a video file previously recorded: Find the file you would like to play, highlight it with your mouse (one click of the mouse button) and click Open. Then click the Play button.
- Delete recorded video files which you no longer want: Click your right mouse button on the video file once, go down the menu and click Delete
Pause-Mode
The pause mode allows you to pause the TV or Video window. Clicking the Pause button on the WinTV application starts the Pause mode. The Pause Menu will drop down.
Click diagram to enlarge.
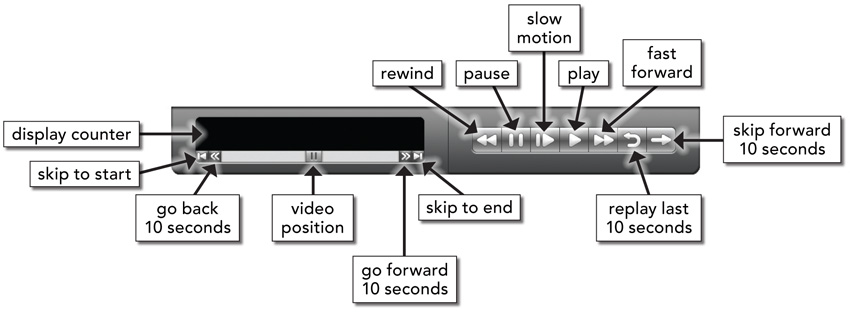
Pause-Buffer
The Pause buffer is space on your hard disk where video is stored during the Pause mode.
The maximum amount of time which your TV program can be delayed is dependent upon how much storage space you have set for the Pause buffer. To change the default pause buffer location licking the symbol spanner//Movies/MPEG.
Delay counter
The delay counter indicates the amount of time that the Live video window has been paused.
If the delay counter indicates 00:01:23 then the Live video window has been paused for 1 minute and 23 seconds.
 Rewind
Clicking the Rewind button while playing video will rewind the recorded video. Clicking the Rewind button again will continue the playing.
 Pause
Pause
Clicking the Pause button causes WinTV to start recording into WinTV's Replay Buffer. It takes about 10 seconds for the Replay Buffer to be initialized and for Pause to become effective. Un-clicking the Pause button will cause the audio/video program to start playing from the point where the button was originally clicked.
Most WinTV functions are active while in the Pause or Pause Live mode. For example, you can change volume, resize the TV window, go into "no-title mode", etc. While in Pause mode, the Video Position bar shows the amount of the Replay Buffer which is filled with video. For example, if the Video Position indicator shows halfway, it means that half of the Replay Buffer is filled. If you find you cannot Pause as many minutes as you would like, increase the size of the Replay Buffer.
While in Pause mode, the A/V stream is always saved in the Replay Buffer. To stop saving the A/V stream in the Replay Buffer, you must exit the Pause mode by clicking TV mode.
 Slow Motion
Clicking the Slow Motion button while playing video will play in Slow Motion. Clicking the Slow Motion button again, will continue playing normally.
 Fast-Forward
Clicking the Fast Forward button one time will fast forward your video at 2X speed. Clicking the Fast Forward button two times will fast forward your video at 8X speed.
 Replay
While in the Pause mode, hitting the Replay button acts like the Instant Replay you see on TV broadcast sporting events: the audio/video goes back in time and you repeat what you have previously seen. Each click of the Replay button causes audio/video to go back 10 seconds.
For example, if you want to repeat the audio/video you saw 10 seconds ago, you would click the Replay button once. If you want to see the video you saw one minute ago, you would need to click the Replay button six times.
For extended replay times, you might find it more convenient to grab the Video Position indicator control bar and move it to the left. Once you let the control bar go, audio/video starts to play (it might take a few seconds for the WinTV application to start playing).
You might have to move the Video Position indicator to the left and right to find the desired spot to start replaying audio/video. While Replaying, your audio/video program continues to be recorded in the Replay Buffer. Therefore, if you have clicked the Replay button 3 times (so that you are replaying the audio/video seen 30 seconds ago), the video you see in the WinTV window will be 30 seconds behind the "live" audio/video program.
 Skip Ahead
Clicking the Skip button will skip the video ahead 10 seconds.
MPEG compression formats
Note: Only available on supported products (PVR / HVR that use a "hardware encoder")
The WinTV supports several formats for MPEG video compression, called Quality Levels. The differences in these formats are:
- The higher the datarate, the better the video quality you see from live TV and your recordings. The higher the datarate, the more disk space which will be required.
- CPU horsepower required during playback and pause mode.
- The compatibility when creating Video CD’s or S-VCD’s.
To configure the MPEG Quality Level, on WinTV click the Preferences button, then Capture and then the MPEG tab. Here are the video formats and the amount of disk space per hour used:
MPEG2 2.0MBits/sec (Full D1) .9 Gigabytes/hour
MPEG2 2.0MBits/sec (Half D1) .9 Gigabytes/hour
MPEG2 12.0 MBits/sec (Full D1) 5.4 Gigabytes/hour
MPEG2 12.0 MBits/sec (CBR) 5.4 Gigabytes/hour
DVD Standard Play 8.0Mbits/sec 3.1 Gigabytes/hour
DVD Long Play 6.2Mbits/sec 2.4 Gigabytes/hour
DVD Extra Long Play 2.5 Mbits/sec 1.2 Gigabytes/hour
SVCD Standard Play 2.5Mbits/sec .8 Gigabytes/hour
Note: CBR is constant bit rate, VBR is variable bit rate.
Which record format should you use?
If you would like to burn a DVD, then chose either DVD Standard Play, DVD Long Play or DVD Extra Long Play. DVD formats record at 720x480 (720x576 with PAL video sources) using 48.0 kHz stereo audio.
If you want to watch the recorded video on your PC, for the best video quality chose MPEG2 12.0MB/sec or DVD Standard Play. If you do not have much disk apace, try the MPEG-2 2.0MB/sec.
SVCD is a nice compromise between video quality and hard disk space. Video is recorded at 480x480 (480x576 for PAL video) at a datarate up to 2.5Mbits/sec.
Once chosen, the Quality Level format is set for both the Pause and Record modes. The format cannot be changed while Recording or while in the Pause mode.
DVD players which are compatible with CD’s and MP3’s can also read DVD’s burned using MPEG video files created with the WinTV.
Creating a DVD
DVD Standard Play: 1 hour 30 minutes on DVD+R/RW disks
DVD Long Play: 1hour 50 minutes on DVD+R/RW disks
DVD Extra Long Play: 4 hours on DVD+R/RW disks
Keyboard Shortcuts
The following keys can be used to access WinTV directly from your keyboard:
In Live TV Mode:
| Channel Up | = | Plus (+) |
| Channel Down | = | Minus (-) |
| Volume Up | = | Page Up |
| Volume Down | = | Page Down |
| A Channel Number | = | 0-9 Enter |
| Take a snapshot still image capture | = | Spacebar |
| Exit Full Screen Mode | = | Esc |
| Open Online Help | = | F1 |
| Mute Sound On/Off | = | CTRL + M |
| Freeze TV Image | = | CTRL + F |
| Copy To Clipboard | = | CTRL + C |
| Snapshot Print | = | CTRL + P |
| Video Source Select | = | CTRL + S |
| Re-size the TV window to and from Full Screen | = | CTRL + T |
| Show EPG information | = | CTRL + I |
| Re-size the TV window to default size | = | Alt + M |
| Start the Pause-function Timeshift | = | Alt + P |
| Start the recording function | = | Alt + R |
| Opens the snapshot save options | = | Alt + F |
| Close the application | = | Alt + F4 |
During recording:
| Channel Up | = | Plus (+) |
| Channel Down | = | Minus (-)/td> |
| Take a snapshot still image capture | = | Spacebar |
| Stop recording | = | Esc |
| Open online help | = | F1 |
| Snapshot Print | = | CTRL + P |
| Freeze TV Image | = | CTRL + F |
| Copy To Clipboard | = | CTRL + C |
| Mute Sound On/Off | = | CTRL + M |
| Re-size the TV window to and from Full Screen | = | CTRL + T |
| Pause the Live TV window (has no effect on the recording) | = | Alt + Q |
| Increase record time by 15 min intervals | = | Alt + R |
| Start the Pause-function Timeshift | = | Alt + P |
| Opens the snapshot save options | = | Alt + F |
| Stop recording and return to Live TV mode | = | Alt + N |
| Close the application | = | Alt + F4 |
In TimeShift-Mode (Pause mode):
| Channel Up | = | Plus (+) |
| Channel Down | = | Minus (-) |
| Take a snapshot still image capture | = | Spacebar |
| Snapshot print | = | CTRL + P |
| Copy to clipboard | = | CTRL + C |
| Mute sound on / off | = | CTRL + M |
| Re-size the TV window to and from Full Screen | = | CTRL + T |
| Pause the Live TV window | = | Alt + Q |
| Pause-Mode stops and recording start | = | Alt + R |
| Start the Pause-function Timeshift | = | Alt + P |
| Opens the snapshot save options | = | Alt + F |
| Exit pause mode and return to Live TV mode | = | Alt + N |
| Close the application | = | Alt + F4 |